The target audience for the 4-hour Basic Water Rescue course includes public safety
personnel (police, fire, EMTs), parents, aquatic fitness instructors, aquatic therapists, child care providers, physical therapy assistants, personal fitness trainers, coaches, athletic trainers and others who work and play around water.
This course provides individuals with information and skills necessary to prevent, recognize and respond to aquatic emergencies. It will also prepare individuals for aquatic emergencies by teaching them how to protect themselves while assisting others.
The Basic Water Rescue course does not provide participants with all the information and skills needed to be certified as a lifeguard.
For info for people (lifeguards or non-lifeguards can use this skill) to save someone at a pool they are visiting see:
How to rescue a drowning victim using a reaching assist or a shepherd’s crook
For information on becoming a Red Cross certified lifeguard see:
Lifeguard Training FAQs

Prerequisites None, but because there is an in-water skills session, it is recommended that participants be comfortable in chest deep water.
Learning Objectives:
.. Learn to recognize, respond and prevent aquatic emergencies
.. Recognize the common hazards associated with swimming pools and explain how to eliminate or minimize such hazards;
.. Recognize the characteristics of someone who needs help in the water;
.. Understand and perform self-rescue skills for aquatic emergencies;
.. Provide assistance to others using non-swimming rescues;
.. Perform proper techniques for possible head, neck or back injuries;
Certification Requirements
.. Attend and participate in all course sessions;
.. Successfully perform all required skills; and
.. Pass the final written exam with a score of 80 percent or better (20 correct answers out of 25 questions).
The Basic Water Rescue certificate is valid for 3 years.
____________________________________
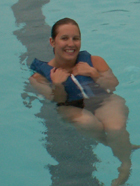
Examples of self-rescue skills taught in the class:
To conserve body heat while awaiting rescue in cold water, use the HELP position —the heat escape lessening posture. When two or more people wearing life jackets find themselves in cold water, the huddle position will help them conserve body heat while awaiting rescue.
If you can reach safety with a few strokes, do so. If not, float in place in the HELP or Huddle position(s) and wait for help. Do not use the HELP or Huddle position(s) in moving water.
(Fremont Union High School District coaches Kiernan Raffo, J C Hovland, Jill Borges and Jeremy Kitchen posed for the next two photos.)
 HELP (heat escape lessening posture) Position
- 1.Draw your knees up to your chest.
2.Keep your face forward and out of the water.
3.Hold your upper arms at your sides, and hold your lower arms against or across your chest.
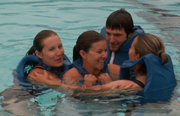 Huddle Position
- 1. With two people, put your arms around each other so that your
chests are together.
2. With three or more people, put your arms over each others’ shoulders so that the sides of your chests are together. Children or elderly persons should be placed in the middle of the huddle.
____________________________________
Examples of removals from the water taught in the class:
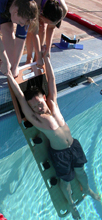
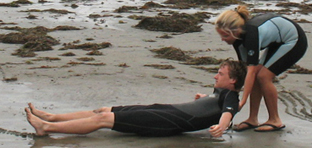 A beach drag is used in shallow water on a sloping shore or beach, or a zero depth exit at a pool. It works well with a heavy or unconscious victim. Do not use a beach drag if you suspect the victim has a head, neck or back injury.
One or two rescuers can stand behind the victim and grasp him or her under the armpits. Support the head with your forearms. Walk back slowly and drag the victim onto the shore. Use your legs and not your back. Pull the victim completely out of the water if you can, but at least get the victim’s head and shoulders out of the water. If someone else is ready to help, drag the victim out together.
On a sloping beach, with an unconscious victim or a victim in shock, turn them as you reach shore so that they are parallel to the shore. If you drag them up without turning them their head will be higher than their feet, the opposite of treating for shock and if you need to give CPR the blood will not flow where you want it to.
There is more at: beach drag .
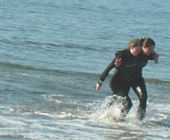 A walking assist is used for a victim who is in shallow water at a pool or waterfront, who can stand and may be able to walk with your help.
Place one of the victim’s arms around your neck and over your shoulder. Hold the wrist of the arm that is over the shoulder, and wrap your free arm around the victim’s back or waist. Hold the victim firmly and help him/her walk out of the water. If someone else is ready to help, help the victim out together.
____________________________________
examples of other assists taught during a Basic Water Rescue class:
 Throwing Assists
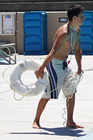
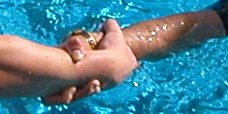
Use a throwing assist to rescue someone beyond your reach in a pool or open water. Throw a buoyant object tied to a line to the victim. S/he can grasp the object and be pulled to safety.
Throwing equipment potentially includes:
Heaving lines
Ring buoys
 Throw bags
Rescue tubes
Homemade throwing devices, such as a heaving jug
Any floating object at hand, such as a picnic jug, small cooler, buoyant cushion, kickboard or extra life jacket
Throwing equipment such as ring buoys can usually be found in plain view at swimming pools and public waterfronts.
To perform a throwing assist
1. Get into a stride position: The leg opposite your throwing arm is forward. This helps to keep your balance when you throw the object.
2. Step on the end of the line attached to the ring buoy/ heaving line/ heaving jug with your forward foot. Avoid stepping on the coiled line with the other foot.
3. Shout to get the victim’s attention. Make eye contact and say that you are going to throw the object now. Tell the victim to grab it. (They might not be able to hear you or respond to you.)
4. Bend your knees and throw the object to the victim. Try to throw the object upwind and/or up current, just over (past) the victim’s head, so that the line drops within reach. If the victim does not immediately notice and grab the line, move yourself on the deck/ on shore so you can pull the line to get the object under the victim’s hand/arm.
5. When the victim has grasped the object or the line, slowly pull him or her to safety. Lean away from the water as you pull.
6. If the object does not get out as far as the victim, quickly pull the line back in and throw it again. Try to keep the line from tangling, but do not waste time trying to coil it. If using a throw bag, partially fill the bag with some water and throw it again.
Wading Assist with Equipment
If the water is safe and shallow enough (not over your chest), you can wade in to reach the victim. Do not enter the water if there is a strong current, if the bottom is soft or if you do not know the condition of the bottom.
If possible, you should wear a life jacket when attempting a wading assist, and take something to extend your reach.
See also:
 How to rescue a drowning victim using a reaching assist or a shepherd’s crook
 How to remove a victim from the pool
How to pass a Red Cross written test
Emergency Action Plan for a coach or swim instructor
Neighborhood Watch applied to swim centers
Again, the Basic Water Rescue course does not provide participants with all
the information and skills needed to be certified as a lifeguard. If you have swimming skill and the time you should consider Lifeguard Training instead. Lifeguard Training FAQS

CEUs are available after you complete this course. Go to: http://www.redcrossstore.org/dp.aspx?pgid=547