In my De Anza College swim classes I have every student learn to use rescue equipment they can find at most pools:
 How to rescue a drowning victim using a reaching assist or a shepherd’s crook
In my upper level swim classes, such as intermediate, advanced, or aerobic, and sometimes in my beginning classes, students can work towards being able to pass the prerequisite swim tests for Red Cross or YMCA lifeguard. They can do this just for fun/the challenge, or to really get ready to attend a lifeguard certification class. (Since I have been a Red Cross lifeguard and lifeguard instructor for decades I have lots of advice.)
The Red Cross prerequisite swim tests are described at: Lifeguard Training FAQS That page has lots of how to pass the tests advice, including some of the standards expected by the Red Cross and is worth reading thoroughly if you are tempted to try a lifeguard class.
Example: a lifeguard candidate will need to be able to pass a test of treading water for two minutes with their hands in their armpits. They will be much happier going into a lifeguard class if they can do so much longer. Some of my students can’t even tread water with no hands for just a few seconds when we start the class, but they progress as we go along. This skill often becomes a competition. We get to where many can tread water holding a ten pound weight at the surface with both hands for quite a long time. (Yes, you guessed it, this is all optional in my swim classes.) Eggbeater treading is not required, but people like to learn it.
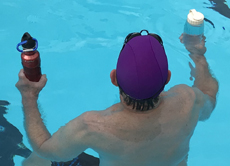
People can gain strength by holding one or two full small (unbreakable) drinking water bottles and try holding one with each hand while treading (one liter of water weighs about 2.2 pounds).
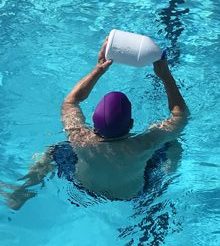
If you have one, you could use a clean gallon (previously filled with bleach, now filled with water) bottle. One gallon of water weighs about 8 1/3 pounds.
You can also try just holding an empty gallon bleach bottle overhead, adding water as you get stronger.
Example: The prerequisite distance for a lifeguard candidates to swim is 300 yards. Many students work on being able to swim longer distances. (A letter to participants in an “Escape from Alcatraz” 1-1/2 mile ocean swim said “if your time for a mile in a pool is slower than 40 minutes, we do not recommend you attempt this swim.” The De Anza pool is 25 yards wide, so 70.4 laps (one width being one lap) would be a mile.)
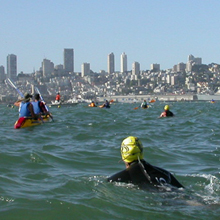
People can also try swimming drills such as swimming with their head up (such as a lifeguard approaching a victim would need to do, or a triathlete sighting on a turn in a race.) The muscles used are quite different than head-down freestyle most swimmers are used to.
A scuba class could require a student to be able to swim underwater on one breath for 25 yards. A lifeguard candidate would be happier if they could at least swim to the bottom of the De Anza deep pool, and for many of my swim students that is a great goal. We start by learning an effective surface dive and an effective arm stroke/kick for underwater swimming, that many students do not have when they join the class. Then try longer and/or deeper underwater swims. (A Navy Seals candidate in a previous swim class, and some others who just wanted to be able to show off, got in shape enough to swim 50 yards underwater on one breath!) The Naval Academy requires midshipmen to complete a 200 meter swim in 5 minutes, 12 seconds and a 40 foot underwater swim. (The De Anza pool is 25 yards wide, or 75 feet.)
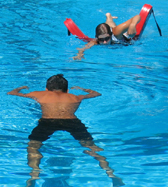 Or try swimming with a rescue tube just to get used to it.
– – – – – – – – – – – – – – – – – – – – – – – – – – – – – – – – – – – – – – – – – – – – – – – – – – – – – – – – – –
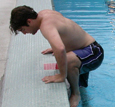
There are difficult ways to climb out of the pool at the side and easy ways. We can teach you the easier ways.
Various swim students have taken the class in anticipation of possibly becoming lifeguards.
There is a free download of all the reading materials available at the class webpage.
____________________________________
 Throwing Assists
Anyone can use a throwing assist to rescue someone beyond their reach in a pool or open water. Throw a buoyant object tied to a line to the victim. S/he can grasp the object and be pulled to safety.
Throwing equipment potentially includes:
Heaving lines
Ring buoys
 Throw bags
Rescue tubes
Homemade throwing devices, such as a heaving jug
Any floating object at hand, such as a picnic jug, small cooler, buoyant cushion, kickboard or extra life jacket
Throwing equipment such as ring buoys can usually be found in plain view at swimming pools and public waterfronts.
To perform a throwing assist
1. Get into a stride position: The leg opposite your throwing arm is forward. This helps to keep your balance when you throw the object.
2. Step on the end of the line attached to the ring buoy/ heaving line/ heaving jug with your forward foot. Avoid stepping on the coiled line with the other foot.
3. Shout to get the victim’s attention. Make eye contact and say that you are going to throw the object now. Tell the victim to grab it. (They might not be able to hear you or respond to you.)
4. Bend your knees and throw the object to the victim. Try to throw the object upwind and/or up current, just over (past) the victim’s head, so that the line drops within reach. If the victim does not immediately notice and grab the line, move yourself on the deck/ on shore so you can pull the line to get the object under the victim’s hand/arm.
5. When the victim has grasped the object or the line, slowly pull him or her to safety. Lean away from the water as you pull.
6. If the object does not get out as far as the victim, quickly pull the line back in and throw it again. Try to keep the line from tangling, but do not waste time trying to coil it. If using a throw bag, partially fill the bag with some water and throw it again.
____________________________________
Examples of self-rescue skills sometimes also taught in my swim classes:
To conserve body heat while awaiting rescue in cold water, use the HELP position —the heat escape lessening posture. When two or more people wearing life jackets find themselves in cold water, the huddle position will help them conserve body heat while awaiting rescue.
If you can reach safety with a few strokes, do so. If not, float in place in the HELP or Huddle position(s) and wait for help. Do not use the HELP or Huddle position(s) in moving water.
(Fremont Union High School District coaches Kiernan Raffo, J C Hovland, Jill Borges and Jeremy Kitchen posed for the next two photos.)
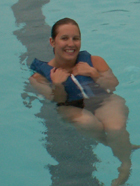 HELP (heat escape lessening posture) Position
1.Draw your knees up to your chest.
2.Keep your face forward and out of the water.
3.Hold your upper arms at your sides, and hold your lower arms against or across your chest.
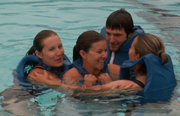 Huddle Position
1. With two people, put your arms around each other so that yourchests are together.
2. With three or more people, put your arms over each others’ shoulders so that the sides of your chests are together. Children or elderly persons should be placed in the middle of the huddle.
____________________________________
Examples of removals from the water we won’t try but are worth looking at:
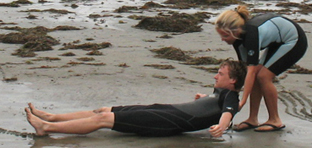 A beach drag is used in shallow water on a sloping shore or beach, or a zero depth exit at a pool. It works well with a heavy or unconscious victim. Do not use a beach drag if you suspect the victim has a head, neck or back injury.
One or two rescuers can stand behind the victim and grasp him or her under the armpits. Support the head with your forearms. Walk back slowly and drag the victim onto the shore. Use your legs and not your back. Pull the victim completely out of the water if you can, but at least get the victim’s head and shoulders out of the water. If someone else is ready to help, drag the victim out together.
On a sloping beach, with an unconscious victim or a victim in shock, turn them as you reach shore so that they are parallel to the shore. If you drag them up without turning them their head will be higher than their feet and if you need to give CPR the blood will not flow where you want it to.
There is more at: beach drag .
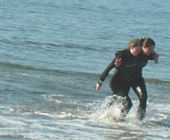 A walking assist is used for a victim who is in shallow water at a pool or waterfront, who can stand and may be able to walk with your help.
Place one of the victim’s arms around your neck and over your shoulder. Hold the wrist of the arm that is over the shoulder, and wrap your free arm around the victim’s back or waist. Hold the victim firmly and help him/her walk out of the water. If someone else is ready to help, help the victim out together.
____________________________________
See also:
How to pass a Red Cross written test
CPO What a certified pool operator (CPO) knows that lifeguards and swimmers should know.
lifeguard training, discussing professionalism is an in-service training project, or perhaps for pool patrons, lifeguard candidates who look at this page to consider on their own.
Tips for guarding open water swims
tips for guarding kids’ triathlons
Emergency Action Plan for a coach or swim instructor
Neighborhood Watch applied to swim centers
——————————————————————-
The author of this webpage, (written as a homework reading assignment for my students), does not give any warranty, expressed or implied, nor assume any legal liability or responsibility for the accuracy, completeness, or usefulness of any information, product, or process included in this website or at websites linked to or from it. Users of information from this website assume all liability arising from such use.
