The Red Cross released a new Lifeguard Training certification program in early February 2024.
August 31, 2024: Basic level lifeguard courses based on the 2017 manuals will no longer be taught.
“all courses must be complete on this date.”
I am leaving this webpage for future reference.
The new manuals are not available online for anyone to download and read.
To get a free download of the copyrighted 2016, released 2017 American Red Cross Lifeguarding Manual go to:
https://www.redcrosslearningcenter.org/s/candidate-lifeguarding
scroll down to
Participant Materials (Core)
then click on and save
Lifeguarding Manual June 2017
– – – – – – – – – – – – – – – – – – – – – – – – – – – – – – – – – – – – – – – – – – – – – – – – – – – – – – – – – –
PLEASE NOTE THAT THESE PAGE NUMBERS ARE FROM THE ORIGINAL PRINTING OF THE MANUAL. IT HAS SINCE BEEN REPRINTED AND YOUR COPY MIGHT NOT HAVE THE SAME PAGE NUMBERS AS WHEN WE WROTE THIS – SO DOUBLE CHECK THEM AS YOU WRITE THEM IN.
To make it easier/faster to find the Red Cross Lifeguarding Manual skills sheets
and in some cases, to make the skills easier to do, write these page numbers/notes at these pages. Or for longer notes just print this webpage, cut out paragraphs and paste them into your manual. I am also including some extra notes on subjects of interest.
On page 4 at the bottom, write: see also Enforcing Rules, page 93 and Interacting Professionally with the Public, page 94
Page 58 One of the listed dangerous behaviors is “Breath-holding or underwater swimming for an extended period after hyperventilating.”
The Red Cross and YMCA of the USA issued a joint statement in May, 2015 that said, in part, swimmers should limit themselves to “a single inhalation” whenever they hold their breath and submerge.
News releases on the subject and more details can be found at Swim Class Safety Rules, required reading for all my swim students. Scroll down to Hypoxic Training.
Page 126 , bottom of the page, left hand side, write: Emergency back-up Coverage, page 72
At the top of page 148 next to the word Entries, write: see pages 169-170.
(Or just write 169-170 next to the word Entries.)
Page 149 next to the word Assists, write: see pages 171-172.
Page 150 next to write: Rescuing a Victim at or Near the Surface write 173-179.
Page 151 just above the words Rescuing a Submerged Victim write: Extreme Shallow Water is the last picture on page 178
Page 151 next to Rescuing a Submerged Victim write: 180-184.
Page 152 next to Multiple-Victim Rescue write: 179.
Page 152 next to Removal from Water write: 185-191.
Page 153 next to Using a Rescue Board write: 192-195.
Page 153 next to Using Watercraft for Rescues write: 196-197
Page 157 next to Surface dives, write: 181, 182
Page 159, at the end of step #2, write: But don’t let any air escape from your nose.
Page 161 next to Escapes write: 198.
Page 161 next to In-Water Ventilations write: 199.
Page 169 at step 4 write: (In some cases for spinal injury victims, you would not want the rescue tube across your chest as you start the rescue.)
Page 174 between steps 1 and 2 write: Without first touching or talking to the victim
Page 174 just above step 4 write: through the entire rescue
(and at page 174 you can add the letter “e” to the word tub at the end of step 5 if you have an edition of the text without that letter.)
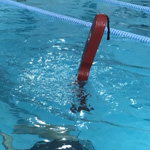
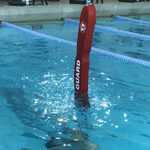
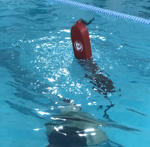
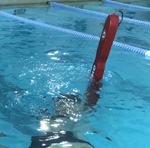
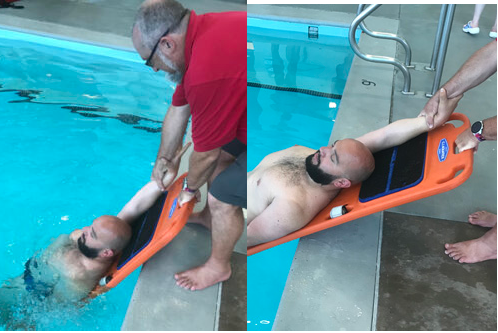
page 175 step 2 write: notice how deeply the tube is pushed underwater in the second picture, with your hand in the center of the tube. (It also shows this in the video.)
page 175 step 3 write: You might find it easier to roll the victim over if you use a bigger “twist.” Swing the victim’s wrist/forearm in a large arc underwater, down, to the side and up. OR you might find it easier if you use instructions from a YMCA Lifeguard Manual: “Grasp the victim’s wrist with your thumb on top. Turn the victim faceup by pulling the arm down and then back up toward the surface (draw a U). Simultaneously, with the opposite hand in the center of the tube, push down to submerge the tube while pulling the victim’s wrist just past your ear and pulling him or her onto the tube.”
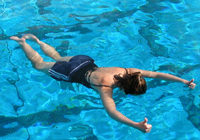
top of page 176 write: Any person who wants to float without moving should signal that they are okay by giving a ‘thumbs-up’ signal so the lifeguards will know they are okay. Even if others at the pool you are at are not familiar with this courtesy, they should be able to understand it.
at (step 1 page 176) write: Since some people fake a passive drowning, you can determine consciousness by quickly splashing and yell HEY at the victim as you approach them .
Page 177 write: The text says, at step 3, “Grab the rescue tube, if you are using one, and position it under the victim’s shoulders.” But placing it literally under their shoulders will not allow the victim’s head to “naturally fall back into an open-airway position.” Note that the rescue tube is under the victim’s back below the shoulders in photo number 2.
(Rescue tube placement is described as “below the shoulders” at pages 175 and 176.)
Page 178 next to the third photo, write: Extreme Shallow Water
Page 179 write: You may find it easier to perform a multiple victim rescue of a small child clinging to an adult if you approach and rescue the adult rather than the child. (This is shown in the second rescue in the video, which looks like a dad who was grabbed by his daughter.)
With two victims of relatively the same size, if you rescue the person doing the grabbing, the one they grabbed may be able to swim on their own once you have rescued/supported both of them.
page 180 write: The text says, at step 4, “Grab the rescue tube and position it under the victim’s shoulders.” But placing it literally under their shoulders will not allow the “victim’s head to fall back naturally into an open-airway position.” Note that the rescue tube is under the victim’s back below the shoulders in photo number 3.
(Rescue tube placement is described as “below the shoulders” at pages 175 and 176.)
Pages 181, 182 and 183 at the top of the pages write: see also Equalizing Pressure, page 159
Page 183 #1 write: a head-first surface dive is okay to use.
As you are doing this rescue, you will feel tension on the rescue tube strap increasing and decreasing as the tube bobs up and down in the air
Page 183, step 4 write: many people find it easier to grab the end of the line to the rescue tube, right where it attaches to the rescue tube, as they position the tube between themselves and the victim. This is especially true with wide rescue tubes and small hands.
Page 185 step 2/3 write: The rescuing lifeguard may be able to help keep the board from sliding sideways and/or floating up from the wall too soon, if they can use their foot or knee to hold the board more firmly against the wall
(See step Page 186, step 5 of Lifeguard Manual.) When doing an extrication using a backboard at the pool edge, it can be easier during the pull/push of the backboard onto the deck if you try to get the board as horizontal as possible as soon as possible, rather than trying to push/pull it at an angle. Especially with a heavy victim, it is easier to slide the board up onto the deck about 50 or 60% of the way, then let it down onto the deck and then slide it the rest of the way flat along the deck, instead of lifting the entire weight of the board and victim for the entire distance.
While pulling it out, when you feel it reach the balance point, flatten it down to the pool deck (you might want to go into a kneeling position to do this), then slide it the rest of the way along the deck:

In shallow water the guard in the water might find it more effective to push up with one knee on the bottom end of the board while standing with the other foot on the bottom OR s/he can stand at the end of the board and let the end rest on their waist line/stomach as they walk forward for part of the push.
Page 186 step 5 write: With a heavy victim this can be easier with a second strap around their upper legs, but this is not recommended for a timed test required for certification, or an employment pre-test with a required time.
Page 187 step 5 write: With a heavy victim this can be easier with a second strap around their upper legs, but this is not recommended for a timed test required for certification, or an employment pre-test with a required time.
At top of page 209 write: see Removing Gloves page 223.
Page 213 next to Emergency Moves write: 227-228.
Page 213 next to Perform a Primary Assessment write: 229-230.
Page 216 next to Using a Resuscitation Mask to Give Ventilations write: 224-226.
Page 216 next to Recovery Positions write: bottom of page 230
Page 230 step 6 at the words If victim is not breathing and has no pulse, begin CPR starting with compressions, write One-Rescuer CPR pages 291-292, Two-Rescuer CPR Adult pages 293-294, Infant pages 295-296.
Page 237 next to Giving Ventilations write: 259-260.
Page 238 next to Resuscitation Masks write: 224-226.
Page 239 next to Bag-Valve-Mask Resuscitators write: 261-262.
Page 241 write: The U.S. Food and Drug Administration (FDA) has made updates to the patient instructions for epinephrine auto-injectors:
http://www.accessdata.fda.gov/drugsatfda_docs/label/2016/019430s061lbl.pdf
Especially note the Injection-Related Complications, for example, “do not inject intravenously, into a buttock, digits, hands or feet.. . Hold leg firmly during injection. Lacerations, bent needles, and embedded needles have been reported when EpiPen and EpiPen Jr have been injected into the thighs of young children who are uncooperative and kick or move during an injection.”
Page 245 next to Caring for an Adult or Child Airway Obstruction write: 263-265.
Page 246 next to Caring for an Infant Airway Obstruction write: 266-7.
Page 246, below figure 8-12 write: If the conscious choking victim is much taller than you and you can’t get into a proper position to give back blows and/or abdominal thrusts, you can ask them to kneel.
Page 246, left hand side, second box, below where it says “Use chest thrusts if you cannot reach around the victim or the victim is pregnant”, write: if the victim is in a wheelchair and the features of the wheelchair make it difficult for you to give abdominal thrusts, even if you kneel behind them, give chest thrusts instead.
At bottom of page 247 write: see also CPR with Airway Obstruction pages 299-300.
Page 248 next to Emergency Oxygen write: 269.
Page 253 next to Suctioning write: 270.
On page 264 write: see also CPR with Airway Obstruction pages 299-300
Page 269 write: Oxygen blow-by for an infant page 250
Page 276 write: One-Rescuer CPR pages 291-292.
Page 277 next to Two-Rescuer CPR write: Adult pages 293-294, Infant pages 295-296.
Page 279 next to Using an AED write: 297-298
Page 281, below figure 9-6, write: dripping wet lifeguards need to dry off before they drip on the victim’s chest, or a dry lifeguard not involved in the water rescue needs to attach the pads and operate the aed.
page 283 at the bottom, write: see page 289
Page 297 write: AED Dos and Don’ts page 280
Page 304 next to SAMPLE write: page 338.
Page 305 next to Checking a Responsive Person write: pages 335-336.
Page 312 next to Caring for External Bleeding write: page 337.
Page 312 at the bottom of the page, write: never use Crazy Glue on a wound
Page 337 at the bottom of the page write: steps to minimize shock are at the bottom of page 314, steps to apply a manufactured tourniquet are on page 313.
Page 342 at the bottom left-hand column where it says “If the victim is not breathing” write: see also Jaw Thrust (without head extension) page 226.
At top of Page 343 write: Head splint pages 359-365.
At the bottom of page 345 write: the backboard shown is a CJ1000 Spine Board (also known as a CJ Backboard System). If your facility has a CJ Rescue 6 Spine Board (plastic) you might want to experiment with adding two more flotation rods to it and then trying the skills in this manual before and after the extra rods are put in, at various heights of gutters/walls, etc.
Page 346 next to Spinal Backboarding Procedure write: 366-367.
Page 346 next to High Edges write: 368-369.
Page 349 next to Speed Slides write: 370-371.
Page 366 end of step 1 write: see pages 361 #6 and 363 #6
Page 367, step 10 It can be easier during the pull/push of the backboard onto the deck if you try to get the board as horizontal as possible as soon as possible, rather than trying to push/pull it at an angle. It can also be easier, especially with a heavy victim, to slide the board up onto the deck about 60% of the way, then let it down onto the deck and then slide it the rest of the way flat along the deck, instead of lifting the entire weight of the board and victim for the entire distance.
Page 367 end of step 7, 369 end of step 6 and 371 end of step 7 write: Some head immobilizers will not attach to the backboard Velcro unless hair is moved out of the way. To do this you will need to put on one head immobilizer at a time as you sweep the hair out of the way.
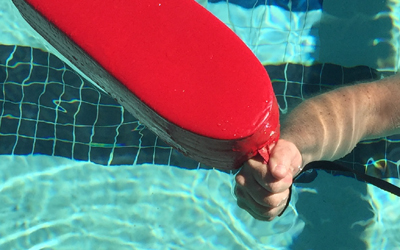
Page 367 step 7 (last photo on page 366) write: Most (but not all) CJ1000 Spine Boards (for example) have the strap with sticky Velcro on the left side of the backboard (left side as referenced to the victim’s left side of their body) and the soft Velcro strip on the right side. If you rescue the spinal injury victim by approaching their right side you will be in a position when you get to step 7 to be able to reach across the backboard and grab the sticky Velcro strap, pulling it tight across the victim, and holding them in place sooner/better, then putting the soft Velcro strap across on top of the first strap you are still pulling on/holding the victim in place with.
In the photo below, the black strap has the sticky sided Velcro, the white strap has the soft sided Velcro strip. You can see the lifeguard’s right hand holding the end of the sticky Velcro strap tightly across the victim’s body, and the lifeguard’s left hand holding the end of the soft Velcro strap, about to place it across and on top of the sticky Velcro strap. It could be wise to try this from each side of the backboards you use for training/rescues at your facility and see for yourself if you have better control/stability.
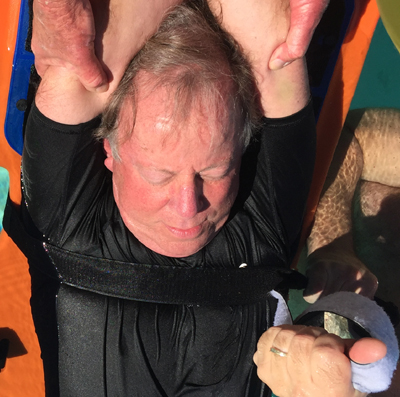
(This is rare, but if your backboard has the soft sided Velcro strap facing up, in a position where it would be pulled across as the bottom strap, and the sticky Velcro strap would go on top of it, then you would want to experiment differently with it.)
If you are using a plastic backboard with separate strap(s) in a Spider Strap configuration, please note that the Spider Strap will float around and the extra ends you are not using can really get in the way, so you should consider replacing the Spider Strap with one strap designed for your model of backboard.
All this is also applicable to page 368 step 5.
Page 369, step 8 It can be easier during the pull/push of the backboard onto the deck if you try to get the board as horizontal as possible as soon as possible, rather than trying to push/pull it at an angle. It can also be easier, especially with a heavy victim, to slide the board up onto the deck about 60% of the way, then let it down onto the deck and then slide it the rest of the way flat along the deck, instead of lifting the entire weight of the board and victim for the entire distance.
Sorry, little spare time . . . NOT ALL of the typos we (myself and three other lifeguards who are also lifeguard instructors / one other Lifeguard Instructor-Trainer) found, or things that seem to be missing/out of place, are listed at this page.
– – – – – – – – – – – – – – – – – – – – – – – – – – – – – – – – – – –
The manual is used for Waterfront Lifeguard (“non-surf, open water areas found at public parks, resorts, summer camps, and campgrounds)” as well as swimming pool lifeguard training. These are the pages to especially review before a WATERFRONT LIFEGUARDING class, in about the order they will be lectured on. (Yes, you will notice that some pages repeat.) 34, 35, water quality 37, 32, 43, 36, thermocline and gasp reflex page 166, 36, 155 cross bearing, 156-7 search, 76 watercraft, 109, 100-101,103-4 buddy systems,109, 125, 124, 176 run and swim entry, 190 walking assist, 190 beach drag, and 365 head-splint, 158 fitting a mask, 160 entering with mask and fins, 157 searching deep water, 192, 193, 194.
– – – – – – – – – – – – – – – – – – – – – – – – – – – – – – – – – – –
Lifeguard Training FAQS has advice on how to pass the prerequisite swim tests.
– – – – – – – – – – – – – – – – – – – – – – – – – – – – – – – – – – –
How to pass a Red Cross test has the advice I give my students before an exam.
– – – – – – – – – – – – – – – – – – – – – – – – – – – – – – – – – – –
This next section could be called the Get Ready to be the Head Lifeguard links:
Some of these are designed for an in-service training project, or perhaps for lifeguard candidates who look at this page to consider on their own.
See Interacting Professionally with the Public, page 94 in the Lifeguarding Manual. lifeguard training, discussing professionalism
Photos of lifeguards on duty who were not ready to rescue
See Enforcing Rules, page 93 and Communication with Patrons and a list of rules on page 92 of the Lifeguarding Manual. Preventative Lifeguarding has notes from various staff manuals, personal experiences and the Red Cross texts. It includes UNSAFE PRACTICES or potential problems TO WATCH FOR, areas where most accidents occur, accident prevention tips that USA Swimming coaches know and suggested disciplinary action for minor and major infractions.
Should lifeguards wear cowboy boots? is a quiz for lifeguards or lifeguard classes
Tips for guarding open water swims
tips for guarding kids’ triathlons
First Aid for Public Safety Personnel study guide
CPO What a certified pool operator (CPO) knows that lifeguards and swimmers should know.
Neighborhood Watch applied to swim centers
A collection of pool rules to choose from is at:
pool rules: attire, health and sanitation
pool rules concerning children

CEUs are available after you complete a Red Cross lifeguard training course. Go to: http://www.redcrossstore.org/dp.aspx?pgid=547