To make training more effective and realistic, manikins are used for skills practice in Cardiopulmonary Resuscitation (CPR) classes, including in lifeguard training.
You will breathe air into the manikin to practice rescue breathing and the manikin chest will rise, because there is a lung bag (airway) inside.
You will do chest compressions (push on the manikin chest the proper way) to practice getting blood flowing during CPR practice.
You will push on the manikin to try to force out something the manikin is choking on.
The Red Cross has said:
“For reasons of educational quality and participant safety,
resuscitation skills are practiced only on a CPR manikin and never on a real person.
These skills include ventilations, chest compressions and automated external defibrillator (AED) use.”
A pocket mask (also known as a CPR Rescue Mask) is required for some classes, but not for others. It’s the device for rescue breathing with the one-way valve so your breaths go into the victim, but their escaping breath doesn’t give you germs. If you try to put in the one-way valve the wrong way, it will not fit.
You should not share your pocket mask.
 A BVM (bag valve mask) reduces the risk of disease transmission and increases the level of oxygen being delivered to a victim. Rescue breathing only gives a victim about 16% oxygen, a BVM can deliver 21%, and BVMs are used with manikins for training in higher level CPR classes.
The proper use of manikins has never been shown to transmit a bacterial, fungal or viral disease.
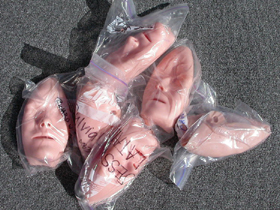
Some manikins have separate “faces” for each student, some do not. At De Anza we have separate faces for all the adult/child and infant sized manikins. We ask students to bring a gallon zip lock bag or other plastic bag to put their “face” in for the duration of the class. This way when you put your mouth on the face, it is only your own germs you touch.
Please remove lipstick as it can stain the faces and do not eat during class as food particles can be blown into the lung bags. Please, no gum chewing.
This website page is not meant to completely teach you how to do the cleaning or how to put a manikin together. You don’t have to memorize all this. It is just to help make you more familiar with the procedure when doing it in a class.
If we ever had a shortage of faces, for the manikins without separate faces the face area must be cleaned (decontaminated) between use by each student.
Be sure to follow current practices, but as an example, an instructor’s manual said:
“Properly decontaminate manikins during class: Between use by students (even when breathing barriers are used) and after demonstrations by the instructor, the manikin’s face and the inside of its mouth should be wiped vigorously. Use a clean, absorbent material (e.g., 4X4-inch liquid household chlorine bleach and water) or with 70 percent alcohol (isopropanol or ethanol). The surfaces should remain wet for at least 30 seconds before they are wiped with a second piece of clean, absorbent material. ”
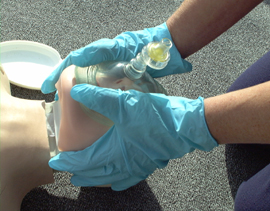
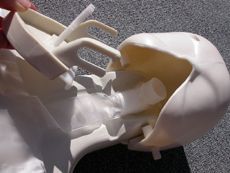
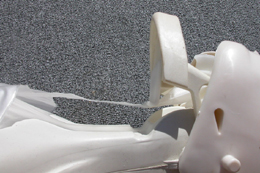
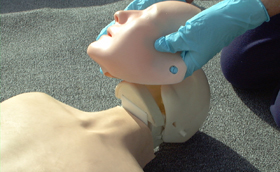
To set up a manikin for use we put in a lung bag. Lift up the chest.
The lung bag airway end goes into the neck area; if it is too low the face will not attach properly.
If you have trouble getting the lung bag airway end in you can CAREFULLY slip out the jaw.
Yes → 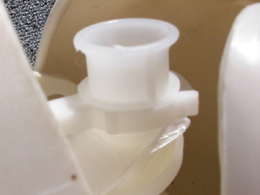
No → 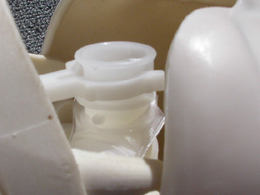
the other end of the lung bag attaches to a hook on the manikin.
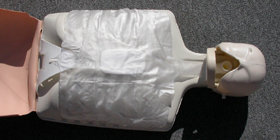
(Flip the chest back into place after installing the lung bag.)
When you turn an adult face inside out you will see a white knob.
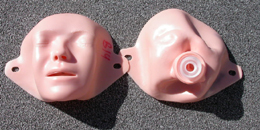
When you attach the face, the white knob on the inside of the face must meet the end of the lung bag. If it does not meet properly the air you breathe in will not go through. If the face is not located properly, the face will look odd when it is attached. If it has high cheekbones, remove it and try again.
right → 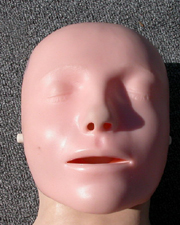
wrong! → 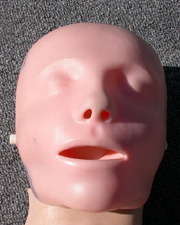
wrong! → 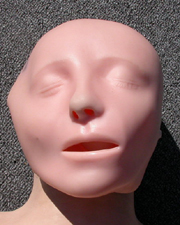
When you first try breathing air in you should breathe hard enough to see the chest clearly rise, but not so hard as to rupture the lung bag!
When the manikins are taken apart at the end of each class session, the white knob on the inside of the face should not be thrown away, but the whole lung bag should be.
RED CROSS GUIDELINES
At De Anza each CPR student gets his/her own adult/child and if appropriate, infant manikin
face, so potential germs will not be shared. The Red Cross notes that if a class does not have separate manikins you should request a separate training manikin if you have if you have a condition that would increase your risk or other participants’ risk of exposure to infections, such as an acute condition, hepatitis B, positive blood test for anti-human immunodeficiency virus (HIV), have had a positive blood test for hepatitis C or have a condition that makes you unusually likely to get an infection. If any of these seem to apply to you, read Red Cross manikin use guidelines
The Red Cross also says:
You can “protect yourself and other participants from infection by following these guidelines:
¦ Wash your hands thoroughly before participating in class activities.
¦ Do not eat, drink, use tobacco products or chew gum during class.
¦ Clean the manikin properly before use.
¦ Please follow current guidelines, but by way of an example, for some manikins, this meant vigorously wiping the manikin’s face and the inside of its mouth with a clean gauze pad soaked with either a fresh solution of liquid chlorine bleach and water (1/4 cup sodium hypochlorite per gallon of tap water) or rubbing alcohol. The surfaces should remain wet for at least 1 minute before they are wiped dry with a second piece of clean, absorbent material.
¦ For other manikins, it means changing the manikin’s face. Your instructor will provide you with instructions for cleaning the type of manikin used in your class.
– – – – – – – – – – – – – – – – – – – – – – – – – – – – – – – – – – – – – – – – – – – – – – – – – – – – – – – – – –
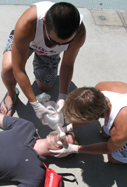
Lifeguards practice multiple rescuer responses where they take turns doing compressions, using the BMV and AED and switch places in relationship to the victim. If an instructor uses a rescue tube with the manikin to simulate the rest of the body, it can be used to remind the lifeguard candidates that they do not want to ever step over a victim during any kind of rotation.

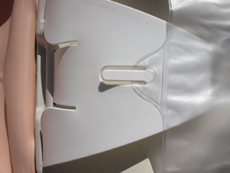
Kickboards can always be more comfortable to kneel on than the pool deck.
The Red Cross has noted:
“If the classroom area is not carpeted, provide knee protection (such as folded blankets, kneeling pads or mats) for instructor candidates to use during reciprocal practice teaching activities and practice teaching assignments that involve skill practices on the floor, or request that candidates bring their own padding materials.”
Some people bring a gardening-type pad or a folded up towel
– – – – – – – – – – – – – – – – – – – – – – – – – – – – – – – – – – – – – – – – – – – – – – – – – –
Take a look at a mechanical compression device, so you will recognize it for what it is if you ever see one being used:
– – – – – – – – – – – – – – – – – – – – – – – – – – – – – – – – – – – – – – – – – – – – – – – – – –
39% of European countries require CPR training
for a driving license. The European Resuscitation Council (ERC) and European Driving Schools Association (EFA are working towards mandatory CPR training for new drivers across Europe. (“Learn to Drive. Learn CPR.”,) The European Parliament has backed mandatory CPR training in its new Driving License Directive proposal.
“Cardiac arrest is a major health problem in Europe and around the world. Every year over 400,000 people in Europe and 60,000 in Italy are affected by cardiac arrest. In 70% of cases, cardiac arrest is seen by laypeople who could start cardiopulmonary resuscitation (CPR) if they knew how to do it.
The immediate initiation of CPR can double or triple survival from cardiac arrest. In fact, if witnesses of cardiac arrest start CPR before the ambulance arrives, the victims’ chances of survival increase two to three times compared to cases in which CPR is not started.”
The above was as of early 2025. See https://cprguidelines.eu/news for updates.
– – – – – – – – – – – – – – – – – – – – – – – – – – – – – – – – – – – – – – – – – – – – – – – – – –
De Anza college students can take a look at photos of
AED locations at De Anza College
to find out the locations of campus AEDs nearest your classrooms.


This webpage is also reading for De Anza College Red Cross First Aid classes so the students can get a preview of using manikins in their CPR class(es).
Some of the other reading for first aid class includes:
How to Call 911, with advice about calling from your cell phone, lists of when to not call 911. In a lot of Canada you can dial 911 in an emergency just like in the U.S. But in other countries it’s often a different number and the webpage has a link to a list from the U.S. Department of State for many other countries.
Bloodborne Pathogens quick facts which includes an adult recommended vaccinations schedule, and areas of hands that are most often missed by healthcare providers when using alcohol-based hand sanitizer.
Cultural issues in first aid Especially in a diverse area such as Silicon Valley, California, everyone anticipating giving first aid should consider that some victims may have very different expectations about how they should be treated and be familiar with some of the cultural differences they may encounter.
The answer (and some wrong answers previous students did not get credit for)
to a question on the final exam: If you suspect a stroke
Causes of fainting, altered mental status, sudden altered mental status, unconsciousness
The class webpage for HLTH57A, has all the reading assignments.
– – – – – – – – – – – – – – – – – – – – – – – – – – – – – – – – – – –
(Note to on-line users not in my classes: this is a study sheet.
It is not complete instruction in CPR or the topic named in the webpage title.)
The author of this webpage, (written as a homework reading assignment for my students), does not give any warranty, expressed or implied, nor assume any legal liability or responsibility for the accuracy, completeness, or usefulness of any information, product, or process included in this website or at websites linked to or from it. Users of information from this website assume all liability arising from such use.
– – – – – – – – – – – – – – – – – – – – – – – – – – – – – – – – – – –