This is a page of common mistakes people make in a CPR/AED for the Professional Rescuer and Health Care Provider class. It is not complete training in CPR. It is not a list of all the possible mistakes.
This page refers to pages in the American Red Cross CPR/AED for the Professional Rescuer text copyright 2011, and will only be appropriate for some skills in books copyrighted later. I am keeping it for reference.
Common mistakes throughout all the skills checkoffs include:
- trying to memorize steps without understanding why you are doing what you are doing
forgetting to check the scene for safety
skipping or combining parts because you think it will save time
checking for breathing or pulse for too short a time
anticipating what will happen next and skipping ahead
getting so busy with the physical steps that you forget to have someone call 911
describing to the instructor what you should be doing instead of doing it
forgetting to use protective equipment (breathing barrier / pocket mask and gloves)
not putting the airway (lung bag) into the manikin properly and engaging it with the knob at the back of the manikin face. This will not allow air into the manikin’s lungs. See: CPR manikin use for details.
stepping over the victim if you need to move around
mixing up whose pocket mask belongs to who (put your initials on the pocket masks and cases)
failing to carefully clean manikin faces between use when needed
______________________________________
Primary assessment
Go to page 22 of your book.
At step 1 a common mistake is:
Not using a combination of tapping and shouting
Step 2 Telling someone to “call the police” instead of call 911. Not supporting the victim’s head and neck while rolling the victim.
Not rolling the
victim as a single unit
Step 3
Not tilting the head back far enough on an adult to open the airway OR tilting it too far on an infant or child
Forgetting to lift the chin
To open the airway, putting your hand under the neck
Incorrect placement of the fingers when lifting the chin, such as putting the fingers on the soft tissues under the jaw instead of under the
bony area at the center of the lower jaw
Closing the mouth when lifting the chin
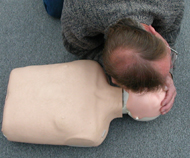
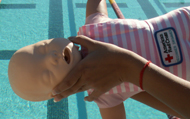
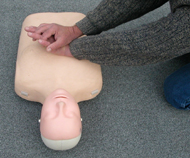
Not placing the ear close enough to the mouth and nose of the victim to check for breathing
Not looking at the chest when checking for breathing (some people look in the wrong direction,
out away from the body, as in the photo below).
Not checking long enough for breathing
Agonal breathing is a gasping noise that many people make when they collapse from cardiac arrest. It can be mistaken for breathing. But a gasp or gurgle in the absence of normal breathing is not normal breathing.
(note to professional rescuers – you are taught to do this skill differently than the public, they will not check for a pulse)
When checking for a pulse, not checking for pulse at the groove at the side of the neck on an adult.
Using your thumb to check for pulse instead of your fingers
Forgetting to check brachial pulse on an infant and checking their carotid pulse at the neck instead
Step 4
Forgetting to pop open the pocket mask
Putting the pocket mask on the face in the wrong direction
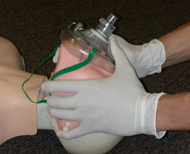
Not firmly pressing down on a pocket mask or breathing barrier to ensure a tight seal
this is wrong, compare it to the photo in your book:
Not pinching the nose shut (when using certain types of breathing barriers or none at all)
Giving breaths too quickly or forcefully
Breathing too fast or too hard
Not watching to see the chest clearly rise and fall while giving each breath
Not taking a breath before giving each breath
______________________________________
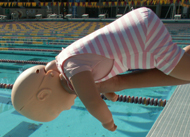
Recovery Positions (page 26)
A common mistake with the H.A.IN.E.S. position shown below is to move too quickly and not carefully go through the steps, but just roll the victim instead.
Pushing or lifting the victim’s head or neck.

______________________________________
Giving Ventilations (page 27)
Not tilting the head back far enough to get breaths in to make the manikin’s chest rise
Not firmly pressing down on a pocket mask or breathing barrier to ensure a tight seal
Trying to use only tips of fingers instead of sides of hands to press down on a pocket mask
Not pinching the nose shut (when using certain types of breathing barriers or none at all)
Giving breaths too quickly or forcefully
Breathing too fast or too hard
Not watching to see the chest clearly rise and fall while giving each breath
Breathing too much on an infant/child or tilting the head as far back as on an adult
Not taking a breath before giving each breath
BVM (page 28)
When using a BVM, concentrating on the use of the bag-valve-mask resuscitator and not tilting the head back far enough.
Step 5
Leaving the breathing barrier, BVM, or pocket mask on the face when checking for breathing
Not rechecking for breathing and a pulse
after about two minutes of rescue breathing
Step 6
Not keeping the airway open when/if an unconscious victim starts breathing again
______________________________________
In the section on page 30 on conscious choking adult and child, common mistakes include:
Starting the back blows on a victim who is able to cough forcefully
Forgetting to get permission from an adult victim or permission from the parent/guardian of a child
Getting so busy helping the victim that you forget to have someone call 911 or the
workplace emergency number
Failing to support the victim
positioning the victim with the upper airway (head and neck) angled upward instead of parallel to the ground or angled slightly downward
Step 1
Striking the victim in the wrong place (it should be in the center of the back between the shoulder blades)
Not striking firmly
Striking the victim with a closed hand or palm instead of the heel of one hand
Step 2
Incorrect placement of your hands, (fist should be within 2 inches of the navel)
Not stopping thrusts immediately if the victim starts coughing or the object is dislodged
Not pushing in and up
Not making each thrust a separate and distinct attempt to dislodge the object.
Forgetting to continue back blows AND abdominal thrusts.
(Abdominal thrusts, chest thrusts and back blows are equally effective. No one technique is proven better. Frequently, more than one technique is needed to free the obstruction.)
On page 31 it says “if the victim becomes unconscious: carefully lower the victim to the ground and provide care for an unconscious choking victim.”
But on page 13 your text says: “Conscious Choking Victim Who Becomes Unconscious. If the victim becomes unconscious, carefully lower the victim to the ground, open the mouth and look for an object. Continue to provide care for an unconscious choking victim.”
______________________________________________
Conscious choking – infant (pages 32-33)
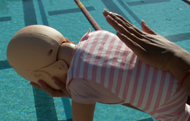
The photos below show wrong methods of holding and helping an infant. Compare them to your text.
In the first photo the back blows are too far down on the back:
in the next the fingers are not supporting the chin, but end up in the face instead:
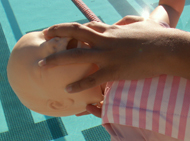
the infant should be carefully positioned along your forearm, not like the next photo:
your fingers should support the head, not be at the neck with the head loose:
______________________________________
Common mistakes in unconscious choking skills (pages 34-35) include:
(A common mistake with an unconscious infant is to mix up the skills for unconscious and conscious.)
Step 1
Not repositioning the airway by retilting the head and giving another ventilation
At any point: Checking for a pulse before the obstruction is cleared and the rescuer
is able to breathe air into the victim
Step 2
Not locating the correct hand position to give chest thrusts
for an infant, placing your fingers across/perpendicular to the breastbone instead of in line with it
for an infant, placing fingers more than one inch below the nipple line, or above the nipple line
Step 3
Not looking in the victim’s mouth for a foreign object
Step 4
Poking your fingers around in the victim’s mouth if you don’t see anything to take out.
Not using a hooking motion while sliding your finger
Step 6
(if the breaths make the chest clearly rise)
Leaving the breathing barrier or pocket mask on the face when checking for breathing
(People who have been previously trained in abdominal thrusts for unconscious choking victims ask why they are now being trained to use chest thrusts. Trials of maneuvers to clear the airway showed that higher airway
pressures can be generated by using the chest thrust rather than the abdominal thrust.)
______________________________________
common mistakes in CPR (page 36) include:
Step 1
(adult/child) Kneeling in the wrong position or place beside the victim
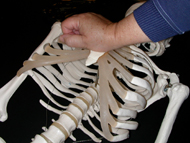
(adult/child) Not properly locating hand position for compressions in the center of the chest. Compressions done out on the ribs or too high or low on the chest will not be effective.
If you could see through to the rib cage, this is what it would look like where you correctly place your hand on the sternum.
Notice in the next picture how big an adult’s fingertips are in comparison to an infant’s sternum (in this case a 15′ tall newborn). Be careful in your placement of fingertips to be certain your compressions will be effective.
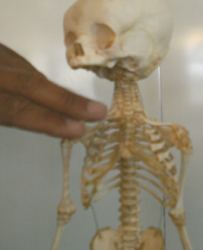
for an infant, placing your fingers across/perpendicular to the breastbone instead of in line with it
for an infant, placing fingers more than one inch below the nipple line, or above the nipple line
(adult/child) Placing the palm rather than the heel of the hand on the breastbone when giving compressions.
Not pressing straight down on the chest
(adult/child) not locating your shoulders right over your hands; it is wrong to have your arms at an angle, as in the photo below:
(adult/child) Pressing with bent elbows instead of straight arms and locked elbows
Not giving compressions deep enough – at least 2 inches for an adult, about 2 inches for a child, about 1 1/2 inches for an infant
Jabbing the compressions, that is pushing down faster than you let up. Compressions should be
rhythmic, you should spend the same amount of time compressing as you spend releasing.
Rocking while doing compressions
Letting your hands lift off the victim, even slightly, between compressions
Failing to keep your fingers off the chest
(especially on an adult) Trying to use muscular strength to do compressions instead of your body weight
Not letting the chest fully rise to it’s normal position after each compression before pushing down again.
Compressions too fast or slow – at a rate of 100 compressions per minute, 30 compressions should take about 18 seconds. (You can have a partner time you during practice)
Not stopping CPR if you notice an obvious sign of life.
______________________________________________
Common mistakes in two-rescuer CPR (page 38) include:
any of the CPR mistakes above
failing to communicate with each other
failing to call for a change at the right time, after about 2 minutes of compressions and breaths
at the time of a change (step 4)
failing to finish with 2 ventilations
stepping over the victim the change roles
taking more than 7 seconds to change positions
wasting time trying to check for a pulse before continuing CPR after a position change. Changing positions should take LESS than 5 seconds
squeezing the sides of the ribs while giving compressions to an infant
______________________________________
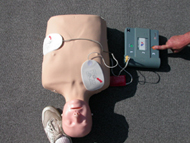
On pages 40-41 Common mistakes using an AED include:
Being so busy with the steps that you fail to be sure that there are no flammable materials in the area, or fail to move a victim from puddles of water.
anticipating what will happen next and not listening to the AED and doing what it says
failing to glove up and as a result, getting a dose of Nitroglycerin when you take off a suspected Nitrogylcerin patch and getting a big headache as a result
failing to take off a suspected Nitrogylcerin patch and having the plastic in the patch explode
wasting time trying to decide if a patch you see is Nitrogylcerin or nicotine
getting gloves stuck on the pads (the real pads are much more sticky than the practice pads)
at step 1 a common mistake is:
Not turning on the AED
Step 2
Being in such a hurry you fail to wipe the chest dry
Wasting time trying to shave the chest of a victim with a lot of chest hair until you have tried using the pads first
At step 3
Incorrect placement of the pads
This is incorrect:
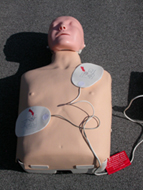
remember, when you are facing the victim directly, with their torso aligned the same as yours, their right side is opposite your left side.
Using an adult aed pad on a child (if there are child pads available) or child on an adult
If the pads are touching each other on a child or infant, failing to place one pad on the front and one on the back
Plugging in the connector (electrode cable) at the wrong time OR before being told to by the machine
Step 5
Not staying clear, or telling others to stay clear, when pushing the analyze button or during
analyzing
Not being certain there is no one using a cell phone or radio within 6 feet of the AED. This may require telling a security guard who is on the radio to move.
step 7
Not staying clear, or telling others to stay clear, when pushing the shock button or during
shocking. (Some AEDs are automatic and do not require the user to press a button to deliver a shock, but you still need to be sure no one is touching the victim)
Checking to be certain others are staying clear, but forgetting to look at yourself
Pushing SHOCK before being prompted by the AED
(some AEDs are automatic and do not require the user to press a button to deliver a shock)
Wasting time checking for a pulse after a shock has been given. Start CPR again right away.
After the AED has given a shock, it is a mistake to give up and not restart CPR compressions. Yes, if the AED says no shock advised, it could mean that there is no defibrillatable electrical activity OR it could mean that it worked and more sets of CPR compressions are needed to get enough oxygen into the muscle cells of the heart to let it start beating again.)
(Follow the AED prompts when giving care, even if they are different from those above.)
______________________________________________
The Red Cross offers free refreshers for CPR students. Copy and paste this URL into your browser:
www.redcrossrefresher.com/q/cpraed-professional-rescuers-and-health-care-provi/choices/
(Please note that the other refreshers at that page are for Lay Responders and the skills are not the same as for Professional Rescuers.)
______________________________________________
See also:
What the AED says as you use it
How to pass a Red Cross written test
CPR Pro skills review questions
Bloodborne Pathogens quick facts
Oxygen administration quick facts
Simple secondary survey study sheet
has:
more details of the SAMPLE questions
Times to suspect a spinal injury: (and use a jaw thrust instead of a head tilt, chin lift).
Reasons why a person might become unconscious or semi-conscious (AEIOU TIPS)
causes of altered mental status, fainting, seizures,
Signs and symptoms of a concussion
care for a stroke
normal respiration, pulse, temperature
and a detailed simple secondary survey (SAMPLE, opqrst)
http://www.wildmed.com/pdf/WMA-Field-Protocols.pdf