This page is for my students to use to review what they heard in videos.
Reading this transcript can never be used as a substitute for being in class and watching the videos, engaging in discussions.
– – – – – – – – – – – – – – – – – – – – – – – – – – – – – – – – – – – – – – – – – –
– – – – – – – – – – – – – – – – – – – – – – – – – – – – – – – – – – – – – – – – – –
Lowering the risk for infection
“Although the risk of getting infected when giving first aid care is very low, providing this care can put you in close contact with another person’s body fluids, which may contain pathogens. Handwashing and using personal protective equipment (PPE) are two main steps you can take to limit your exposure to pathogens.”
– – – – – – – – – – – – – – – – – – – – – – – – – – – – – – – – – – – – – – – – – –
and see more at: Bloodborne Pathogens quick facts
– – – – – – – – – – – – – – – – – – – – – – – – – – – – – – – – – – – – – – – – – –
Handwashing
“Handwashing is the best approach to lowering the risk for infection. As time allows, wash your hands before giving care and ALWAYS wash your hands after giving care. Wash your hands using soap and warm water for at least 20 seconds. If soap and water are not available, you can use an alcohol-based hand sanitizer. Dispense the recommended amount of product into the palm of one hand. Rub your hands together to cover all surfaces, including underneath the nails and between the fingers. Continue rubbing your hands together until the product evaporates, which will take about 30 seconds. Although alcohol-based hand sanitizers reduce the number of pathogens on your hands, they don’t eliminate all types of pathogens. So, as soon as handwashing facilities are available, wash your hands with soap and water.”
– – – – – – – – – – – – – – – – – – – – – – – – – – – – – – – – – – – – – – – – – –
There is more about handwashing at: bloodborne pathogens quick facts
– – – – – – – – – – – – – – – – – – – – – – – – – – – – – – – – – – – – – – – – – –
Personal Protective Equipment
“Personal protective equipment, or PPE, such as latex-free disposable gloves, CPR breathing barriers, face masks and eye protection, can help lower your risk for getting or transmitting an infectious disease when giving care. Latex-free disposable gloves, and possibly other PPE, are included in First Aid and bleeding control kits. It is best to use PPE when giving care, if available. However, often PPE isn’t available. Remember, your risk for infection is very low, so don’t wait until you have PPE to take action. You can give care without PPE, but make sure to wash your hands as soon as possible after giving care, especially after handling blood and other bodily fluids. Also, avoid contact with your mouth and eyes. If you are exposed to blood, contact your health care provider right away. Also, avoid toughing other surface with your gloved hands, because germs can transfer from the gloves to other items or surfaces. This will put the next person who handles the item or touches the surface at risk for infection. After you give first aid care, you should remove gloves using proper technique to avoid contaminating the wearer’s own skin, like this.”
(demonstrates removing gloves without dialogue)
“Keep in mind that even when you wear gloves to give First Aid care, you should always wash your hands after giving care.”
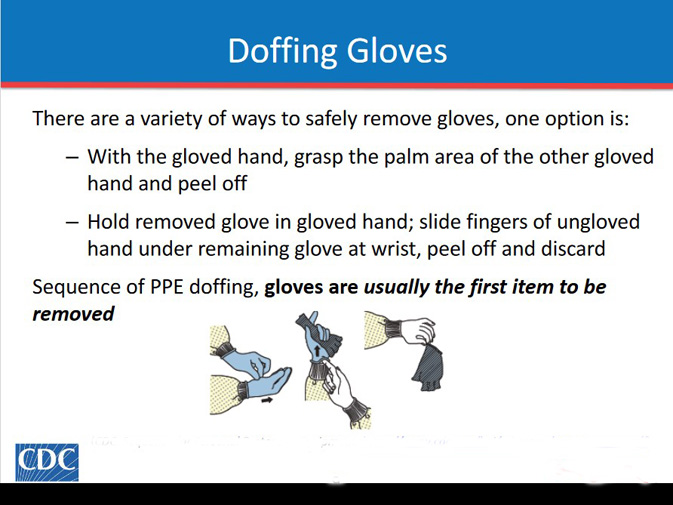
Removing latex-free disposable gloves
Photo with caption below it: “First, pinch the palm side of one glove on the outside near your wrist.”
Narrator says: “For proper glove removal, first, pinch the palm side of one glove on the outside near your wrist.
Photo with caption below it: Pull the glove toward your fingertips, turning it inside out as you pull it off your hand. “ (narrator says the same words).
Photo with caption below it: “Hold the glove in the palm of your other (still-gloved hand.” (narrator says the same words).
Photo with caption below it: “Carefully slip two fingers under the wrist of the other glove. Avoid touching the outside of the glove.” (narrator says the same words).
Photo with caption below it: “Pull the glove toward your fingertips, turning it inside out as you pull it off your hand. The other glove is now contained inside.”
Photo with caption below it: “Dispose of the gloves properly (follow facility policies for when gloves need to be disposed in red biohazard waste bag) and wash your hands.” Narrator says “Dispose of the gloves properly and wash your hands.”
– – – – – – – – – – – – – – – – – – – – – – – – – – – – – – – – – – – – – – – – – –
Here is a drawing from the Centers for Disease Control about removing latex-free disposable gloves.
Please note that at work you will use the method your workplace says to use, which might be a little different than you learn in a first aid class.
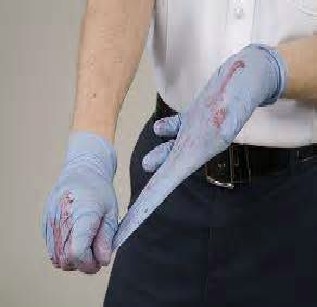
This incorrect method of removing gloves gives you (and maybe others) a risk of splashing:
– – – – – – – – – – – – – – – – – – – – – – – – – – – – – – – – – – – – – – – – – –
Recognizing emergencies and gaining confidence to act
“Sometimes it will be obvious that an emergency exists. But other times, the signs of an emergency may be less obvious. In order to determine if an emergency exists, you will use all your senses. The first signs of an emergency often include: Unusual noises, for example, screaming, crashing or crying. Unusual odors, like a chemical or other noxious smell. Unusual appearances or behaviors, such as a person moaning, staggering, appearing unresponsive or clutching their throat.
Our goal is for each of you to leave this course with the confidence, knowledge and skills to take action when an emergency occurs. Remember that the risk of infection when giving first aid care is very low. Using personal protective equipment, or PPE, reduces the risk even further. After you recognize that an emergency exists, and have decided to act, your role in an emergency may include: Checking the scene, obtaining consent and checking the person; calling 9-1-1 and getting equipment; and giving care according to your level of training. These steps will all be explained next.”
CHECK-CALL-CARE
“An emergency can be stressful, but you can take steps to help a person in any emergency situation from cardiac arrest, to choking, to life-threatening bleeding. The idea is that you don’t have to think about what the specific emergency is. You just need to remember three steps and you’ll be prepared to help. The three steps are Check, Call and Care.”
CHECK
“The first step is Check. This step includes checking for safety, obtaining consent, and checking the ill or injured person. Remember, safety first! You must check the scene to make sure it is safe before you go help the person. Here are some examples. Would enter a burning building without training? No. Is it safe to cross downed power lines? No. So, just check for safety and don’t enter an unsafe scene. Instead, immediately call 9-1-1 or tell someone to do so.
– – – – – – – – – – – – – – – – – – – – – – – – – – – – – – – – – – – – – – – – – –
There is more about checking the scene at: checking the scene for safety
– – – – – – – – – – – – – – – – – – – – – – – – – – – – – – – – – – – – – – – – – –
After checking the scene for safety, check the person and obtain consent. Checking the person includes forming an initial impression, then conducting a more thorough check.
You should obtain consent after you have formed an initial impression, but before you touch the person to complete your check. So, let’s address consent first. To obtain consent, tell the person, or the parent or legal guardian of a minor, who you are (photo on screen but not in narration): “that you are trained”) and what you plan to do. This is as simple as saying ‘my name is Joanne and I’m trained in First Aid. I’m going to check you and help you based on my training.’ Then, continue helping them unless they say they don’t want your help. In that case, you can’t check or care for them, but you can call 9-1-1 if you think they need help. A person who appears unresponsive or mentally altered for example, they’re confused or disoriented may not be able to give consent. In another case, the parent or guardian of a minor may not be present to give consent. In these situations, consent is implied under the law. Basically, the law assumes the person would give consent if they could or if the parent or legal guardian were present. So, go ahead and help them.
And now, let’s address checking the person. You must check the person to determine what is wrong and what you should do next. You can usually get an idea of what’s going on with the person as you approach them. This is called the initial impression. As you form an initial impression, ask yourself: Does the person appear unresponsive? Do they seem to be breathing? Are they bleeding a lot? Do they look sick or hurt? When you reach the person, you have a decision to make based on whether the person appears unresponsive, is experiencing a life-threatening emergency or has a non-life-threatening injury or illness. It’s a lot to take in, so let’s break it down. Okay. If the person appears unresponsive during the initial impression, you need to check them for unresponsiveness. At the same time, you should check for breathing, life-threatening bleeding, and any other life-threatening condition that you might not have seen during the initial impression.
To check for responsiveness, quickly do the shout-tap-shout sequence. Simply shout the adult’s or child’s name, tap them on their shoulder or their arm and shout again. Paula, you okay? Paula? For an infant, shout their name, tap them on the bottom of their foot and shout their name again. Noah, sweetie! (taps) Noah!
If the person does not respond to you in any way, such as by moving, opening their eyes, or moaning—they’re unresponsive. You can check for breathing while checking for responsiveness.
First, make sure the person is face-up. If they are face-down, roll them onto their back, taking care not to create or worsen an injury. Then, look to see if the person’s chest is rising and falling. Normal breathing is quiet, regular and effortless. Agonal breaths, or isolated or infrequent gasps, are not considered normal breathing. To check for life-threatening bleeding or other life-threatening conditions, quickly scan down the person’s body looking for blood or other signs and symptoms. “She’s not responding or even breathing. I don’t see any blood though.”
Checking for responsiveness, breathing, life-threatening bleeding and other life-threatening conditions may seem like a lot to do at once. But remember, it is a quick check that should take no more than 5 to 10 seconds. Now, if at any time you determine that the person is experiencing a life-threatening emergency – that is they are unresponsive, responsive but not fully awake, not breathing, experiencing life-threatening bleeding or they have another life-threatening condition stop the Check step and immediately move to the Call step. Then, give care according to your level of training. In addition, you should continue your check as appropriate to determine if additional care is needed.”
“If your initial check reveals that they are experiencing a non-life-threatening illness or injury, you will also continue your check of the person to see if they have conditions that require care. To continue your check, first, ask the person questions about their health and what is wrong and then check the for signs of illness or injury.
When giving care for children and infants, you’ll often need to ask the parent or guardian questions about the child’s or infant’s health and signs and symptoms in addition to talking with the child. So, how do you remember what questions to ask? You can use SAM to help you remember. What does SAM stand for? Signs and Symptoms, Allergies, Medications and Medical Conditions. Simple to remember, right? You would ask the person questions like What is bothering you? Do you have any allergies? Do you take any medications? Do you have any medical conditions? That’s it! All you have to do is remember SAM. Signs and Symptoms, Allergies, Medications and Medical Conditions. Very simple, very straightforward.
Next, you should do a quick focused check of the person. What you check is based on what the person or the parent or guardian has told you, how they are acting and what you see. So if the person tells you that their arm hurts, focus your check there and look for signs of an injury. Or, if the person is crying and grimacing in pain, and you see some blood on the ground that seems to be coming from underneath their leg, carefully check for an injury to their leg or back. The person may have multiple signs of an injury or illness in different areas of their body. For example, they may report pain in their stomach and pain in their hip. In this case, be sure to do a focused check in each of these areas. The reason you should ask questions and do a focused check is because as time goes on the person may be less able to say things. You may gather information that others may not be able to gather later.”
CALL
“So, after Check the next step is Call. Of course, you’ll want to care for the person right away but first, you want to make sure other help is on its way, if necessary and that you have the equipment you need to help. Therefore, Call may include calling 9-1-1 to activate emergency medical services and getting equipment such as an AED, a First Aid kit and a bleeding control kit. Depending on the circumstances, you can either send someone to do this or do it yourself.
Just a quick note: Throughout the course, we will refer to 9-1-1 as the emergency number to call. In most areas, 9-1-1 will work, however, if you live or work an area without 9-1-1, use the local designated emergency number. Also, if your facility uses an internal number to activate an emergency action plan and EMS, use that number. Okay, so based on the type of injury or illness the person has, you can decide whether or not you need to call 9-1-1. If you didn’t find anything, or the person only has a minor injury or illness, you may not need to call 9-1-1 for help. This may be something that you can handle on your own using your First Aid skills and guidance from the Red Cross First Aid app. In this case, get or have someone bet a First Aid kit and move to Care. However, if you do need to call 9-1-1, either make the call yourself or ask someone at the scene to do it. Using a cellphone to call for help is nice, especially when you put it on speakerphone. EMS dispatches are often trained to give you guidance. If you ask someone to make the call, always pick someone specific. If you just yell, “someone call 9-1-1!” you won’t know for sure if it’s going to get done. So instead, look directly at one person and say, “You, call 9-1-1.” That way, you know who made the call and that help is on the way.”
– – – – – – – – – – – – – – – – – – – – – – – – – – – – – – – – – – – – – – – – – –
There is more at: How to call 911
which includes:
what to do if you dial 911 by mistake
advice for using a cell phone to call 911
situations to NOT call 911
and the answer to the question: “Why Shouldn’t I Just Drive the Patient Myself” instead of getting an ambulance.
– – – – – – – – – – – – – – – – – – – – – – – – – – – – – – – – – – – – – – – – – –
CARE
“The final step is to give care according to the conditions that you find and your level of knowledge and training. Throughout the course we will teach specific action steps that you can take to give care for life-threatening emergencies. You should always follow these general guidelines:
Give care consistent with your knowledge and training.
Offer to assist the person with medication administration, if needed.
Help the person rest in the most comfortable position.
Keep the person from getting chilled or overheated.
Reassure the person by telling them that you will help and that EMS personnel has been called, if appropriate.
Continue to watch for changes in the person’s condition, including breathing and level of responsiveness.”
“No matter what the emergency is, the Check-Call-Care approach will get you through it. Throughout this course, we will give you key information that will help you save a life. But above all else, we want you to remember these three steps: Check-Call-Care. In every skill we teach you, we’ll keep going through these steps. That way, in an emergency, you can revert to something simple that you can easily remember. This will help you remain calm, feel confident, and make you more successful at helping to save someone’s life.”
– – – – – – – – – – – – – – – – – – – – – – – – – – – – – – – – – – – – – – – – – –
Recovery position
“It is important to turn a person who is unresponsive but breathing or is responsive but not fully awake onto the side to lower the risk for choking and aspiration. Turning the person toward yourself, rather than away from yourself, allows for more control over the movement and helps you monitor the person’s airway. To put a person in the recovery position, extend their arm closest to above their head. Now, roll the person toward you, onto their side so that their head rests on their extended arm. Finally, bend both of their knees, like this, to stabilize their body.
– – – – – – – – – – – – – – – – – – – – – – – – – – – – – – – – – – – – – – – – – –
– – – – – – – – – – – – – – – – – – – – – – – – – – – – – – – – – – – – – – – – – –
Recognizing choking (adult and pediatric)
Choking is especially common in young children and older adults, but a person of any age can choke. Quickly recognizing that the person is choking can save their life. First, check the scene for safety and check the person for signs of choking. When forming an initial impression, you may notice the person looks panicked, confused or surprised. They may be turning blue or they may hold their neck with one or both hands. You may hear coughing, high-pitched squeaking noises or see them trying to cough, speak or cry, but hear nothing at all. If you see these signs, obtain consent then ask the person “Are you choking?” For a child or an infant, obtain consent from the parent or guardian. If the person can speak or cry or is coughing forcefully, encourage them to keep coughing. A person who is getting enough air to speak, cry, or cough forcefully is getting enough air to breathe. However, keep checking the person and be prepared to act if their condition changes. Do not allow them to leave your presence and do not leave them alone because their condition may change for the worse. If the person is making high-pitched noises or is unable to speak, cry or cough forcefully, their airway is blocked. This is a life-threatening emergency. Call 9-1-1 and get the equipment or tell someone to do so. Then, immediately give care according to your level of training. A choking person with a blocked airway will soon become unresponsive unless the airway is cleared.
– – – – – – – – – – – – – – – – – – – – – – – – – – – – – – – – – – – – – – – – – –
– – – – – – – – – – – – – – – – – – – – – – – – – – – – – – – – – – – – – – – – – –
General approach to sudden illness
Illness may strike at work, at school, at home or while you’re out having fun. When a person becomes suddenly ill, follow the emergency action steps, Check-Call-Care as you’ve learned to do for any emergency situation. Check the scene for safety, form an initial impression, obtain consent and continue checking the person. If they are experiencing a life-threatening, sudden illness, call 9-1-1 and get the equipment or tell someone to do so.
Life-threatening, sudden illnesses include an asthma attack, anaphylaxis, heart attack, opioid overdose, diabetic emergency, seizuse, shock or stroke. In young children and infants, high fever and dehydration resulting from vomiting, diarrhea and other conditions can become life-threatening. Then, give care according to the condition found and your level of training.
You will learn specific care steps, including assisting with medications, for several of these life-threatening illnesses. But first, let’s review a few general care steps that you should take for all these conditions.
Positioning is an important general care step. An unresponsive person who is breathing or a person who responds but is not fully awake should be placed in the recovery position.
A responsive person who is fully awake should be allowed to assume a position of comfort, such as sitting upright and leaning forward, if they wish, and loosening any tight clothing.
A person who is actively seizing should be monitored until the seizing has stopped. Turn them onto their side in the recovery position if it is possible to do so without injury. If they become unresponsive, position them in the recovery position.
General care for life-threatening sudden illnesses may also involve assisting a person with medication administration. To assist with medication administration, always follow these steps: Explain to the person or family member what you’re going to do; offer to get their medication; ask them to confirm that you have the right medication; assemble the medication device, if necessary; and, finally, give them the medication to self-administer. Note . . . you should not administer medications unless it is allowable by state laws and regulations and you’re trained and authorized to do so. Additional training on medication administration is available through the American Red Cross if you need it. Other general care steps include keeping the person from getting cold or overheated and monitoring and reassuring them until EMS arrives and begins their care.
Stroke
A stroke occurs when blood flow to part of the brain is interrupted by a blood clot or by bleeding from a vessel, resulting in the death of brain cells. Effects throughout the body are possible, including paralysis, loss of speech, problems with memory and trouble with thinking. Strokes can cause permanent damage, but with quick action, sometimes the damage can be stopped or reversed. The FAST mnemonic can help you easily recognize the common signs of stroke and give EMS professionals crucial life-saving information. Signs that indicate possible stroke include: Facial weakness on one side of the body; Arm weakness or grip weakness on one side of the body; Speech disturbance. If you think that a person is having or has had a stroke, call 9-1-1 and get equipment immediately or tell someone to do so. After calling 9-1-1, note the time of when the signs and symptoms first started. If you do not know when the signs and symptoms started, note the last time the person was known to be well. This is important information to give to EMS professionals. Some medications and procedures used to treat stroke are only effective within a certain time frame after the onset of signs and symptoms. Then, stay with the person and provide reassurance until help arrives. Continue to check for responsiveness and breathing. If the person is responsive but not fully awake, drooling or having trouble swallowing, put them in the recovery position. Then, monitor the person’s condition until EMS professionals arrive and begin their care.
– – – – – – – – – – – – – – – – – – – – – – – – – – – – – – – – – – – – – – – – – –
Take a look at the answer
(and some wrong answers previous students did not get credit for)
to a question on the final exam: If you suspect a stroke
– – – – – – – – – – – – – – – – – – – – – – – – – – – – – – – – – – – – – – – – – –
Shock
Shock is a progressive, life-threatening condition in which the circulatory system fails to deliver enough oxygen-rich blood to the body’s tissues and organs. Common causes of shock include life-threatening bleeding, infection and anaphylaxis, but shock can develop quickly after any serious injury or illness. A person who is showing signs and symptoms of shock needs immediate medical attention. Signs and symptoms of shock include: A rapid, weak heartbeat, rapid breathing, pale, greyish, cool moist skin, changes in levels of consciousness ranging from unresponsive to confused, restless or irritable, nausea or vomiting and excessive thirst. After completing your check and call steps, give care for the person in shock according to your level of training. First, provide care according to your training for the condition causing the shock. Then have them lie flat on their back and maintain body temperature. If they get cold, cover them with a blanket. Or, if they are hot, consider removing a layer of clothing. Also, don’t give them anything to eat or drink. This will help prevent vomiting and aspiration.
Finally, as with sudden illness, provide reassurance and continue to monitor the person’s condition.
Asthma attack
A person with asthma should be able to let you know if they’re having an asthma attack. Signs and symptoms of an asthma attack include: Wheezing or coughing, Rapid shallow breathing or trouble breathing, Being unable to talk without stopping for a breath in between every few words, Anxiety and fear and sweating. For a person who is experiencing an asthma attack, quick-relief medication, such as albuterol, can help quickly open their airways and allow easier air passage. This medication is delivered via an inhaler. You may assist with administering this medication. Follow the general care steps for assisting with medication administration, then: Shake the inhaler. Remove the mouthpiece cover and attach a spacing device, if necessary. Give the device to them. And encourage them to use it as directed by their healthcare provider. Finally, be aware that more than one dose of medication my be needed to stop the asthma attack. The medication may be repeated after 10 to 15 minutes.
Anaphylaxis
Anaphylaxis is a life-threatening allergic reaction that can cause shock and affect the person’s ability to breathe.
Signs and symptoms of anaphylaxis include: History of an allergy, signs of an allergic reaction, swelling of the face, neck, tongue or lips, trouble breathing, shock and a change is responsiveness.
Epinephrine can help slow or stop the effects of anaphylaxis. People known to have an allergy may carry an epinephrine auto-injector. There are several different epinephrine auto-injectors on the market. You may assist the person or family member with this medication. Follow the general care steps for assisting with medication administration, then: Give them the epinephrine auto-injector. Hod the person’s leg firmly to limit movement. Encourage them to use the epinephrine auto-injector as directed by their health care provider. And finally, massage, or have the person massage, the injected area for 10 seconds. If the person si still having signs and symptoms 5 to 10 minutes after administering the first dose and EMS has not arrived, help the person to administer a second dose.
– – – – – – – – – – – – – – – – – – – – – – – – – – – – – – – – – – – – – – – – – –
Anaphylaxis quick facts includes prevention and an answer to the question:
Can a person who is prescribed an epi-pen risk going into the wilderness?
– – – – – – – – – – – – – – – – – – – – – – – – – – – – – – – – – – – – – – – – – –
Heart attack
A person having a heart attack may have persistent chest pain, pressure or squeezing, or isolated, unexplained discomfort in the arms, neck, jaw, back or stomach. In addition to these classic signs and symptoms, a person may have more general signs and symptoms, including dizziness or light-headedness, trouble breathing, including shortness of breath, pale, grey or bluish skin, nausea, vomiting, or diarrhea, extreme fatigue, sweating, a feeling of anxiety or impending doom, and unresponsiveness.
Although men often have the classic signs and symptoms of a heart attack, women may have more subtle signs and symptoms. The classic signs and symptoms my not be the most obvious, or they may experience the signs and symptoms of heart attack differently than men do. For example, in women, the classic signs of a heart attack may be milder, or accompanied by more of the general signs and symptoms.
If you think a person is having a heart attack, after calling 9-1-1 and getting an AED and a First Aid kit, assist them with aspirin to help minimize the effects of the heart attack. First make sure the person is awake, can follow simple commands and can chew and swallow. Then, follow the general care steps for assisting with medication administration. Next, give the person two to four 81-milligram low-dose aspirin tablets. So, that’s a total of 162 to 324 milligrams. Or, give one 325-milligram regular-strength aspirin tablet, which can be enteric-coated or non-enteric coated. Finally, tell the person to chew the aspirin completely. If the person takes a prescribed medication for chest pain, such as nitroglycerin, assist them with it.
Opioid overdose
Opioids are drugs that are prescribed to reduce pain. The effectiveness of opioid drugs has led to their widespread use, but we have also seen misuse and addiction, fueling what is being called the opioid epidemic.
Signs and symptoms of opioid overdose include evidence of opioid use and decreased breathing effort, for example, breathing slowly and perhaps only a few times a minute; unresponsiveness; bluish or greyish colored skin, and cardiac arrest. It the person with a suspected opioid overdose is unresponsive and not breathing, immediately begin CPR or compression-only CPR, depending on your training. If there is a family member or a person trained, they can administer naloxone. You may assist a family member with administering naloxone to temporarily reverse the effect of opioids. Naloxone may be given via the nose using a nasal atomizer or nasal spray.
– – – – – – – – – – – – – – – – – – – – – – – – – – – – – – – – – – – – – – – – – –
The Centers for Disease Control (CDC) has videos about how to use Narcan (Naloxone) that are not required for you to watch for this class.
https://www.cdc.gov/stop-overdose/caring/naloxone.html
– – – – – – – – – – – – – – – – – – – – – – – – – – – – – – – – – – – – – – – – – –
Diabetic emergency
Diabetes is a condition that makes it difficult for the body to process glucose, commonly known as sugar. There are two types of diabetic emergencies: when the person’s blood glucose, or sugar, is too high and when their blood glucose is too low. If the blood glucose is too low, then giving sugar can be lifesaving. If you don’t know whether the person’s blood glucose is to low or high, it’s good to give some sugar. The sugar you give will be lifesaving if their blood glucose is low and will not have a major negative impact if their blood glucose is high. Signs and symptoms of a diabetic emergency include: trouble breathing, fast or deep breathing, feeling weak or different, sweating and a fast heartbeat. If the person is known to have diabetes and is having a diabetic emergency, or requests some form of sugar, you can help by giving sugar. First, make sure the person is awake, can follow simple commands and can chew and swallow. Then, follow the general care steps for assisting with medication administration. Finally, give the person 15 to 20 grams of sugar. The recommended amount of sugar is 15 grams for children and 20 grams for adults. If possible, give glucose tablets, liquid or gel. However, other acceptable forms of sugar include: 7 ounces of orange juice, 14 ounces of milk, or candy with fructose or sucrose, such as 20 to 25 Skittles, 2 strips of fruit rolls or 10 to 20 jelly beans.
Recognizing life-threatening bleeding
Volume and flow are two ways to tell if bleeding is life-threatening. Volume is the amount of blood present. Think about a soda can.
Bleeding may be life-threatening when the amount of blood present is equal to about half of what a soda can contains.
In a small child or an infant, bleeding may be life-threatening when the amount of blood loss is even less.
Flow is the movement of blood. Blood that is flowing continuously, or spurting, is a sign of life-threatening bleeding.
To recognize life-threatening bleeding, look at the amount of blood – volume – and how the blood moves – flow.
Using Direct Pressure and a Tourniquet to Control Life-Threatening Bleeding (Adult and Pediatric)
Applying firm continuous pressure stops bleeding. Depending on the situation, the location of the wound, and the equipment you have, you may use direct pressure, a tourniquet, or both to control life-threatening bleeding.
Applying Direct Pressure
Use direct pressure to stop life-threatening bleeding when the wound is on the head, neck or trunk, the wound is on the arm or a leg and you’re waiting for someone to bring a tourniquet, or no tourniquet is available. You can also use direct pressure to stop non-life-threatening bleeding. It takes a lot of pressure to stop life-threatening bleeding, that’s why you need to push hard. The amount of pressure might be painful for the injured person – that’s OK. You need to use a lot of pressure for the bleeding to stop. A flat, hard surface underneath the injured body part allows you to press against something, increasing the effectiveness of the direct pressure.
To begin, if you have gloves, wear them. But if the bleeding is life-threatening and you don’t have gloves, begin providing care immediately. Make sure you wash your hands thoroughly after giving care. Then, find the source of the life-threatening bleeding. Remember, there may be more than one wound. You need to focus on any wound that is causing life-threatening bleeding first. Next, you’re going to place a dressing on the wound. A dressing is a pad that absorbs blood and can promote clotting. Bleeding control kits and first aid kits often contain special dressings called hemostatic dressings. This is a hemostatic dressing. It contains a substance that promotes clotting, and can help stop bleeding faster. When there is life-threatening bleeding, use a hemostatic dressing if you have one. Otherwise, use a gauze pad or other available material such as a clean t-shirt as a dressing. The technique of applying direct pressure is the same regardless of the type of dressing you use. Place the dressing on the wound, and push down with both hands. You need to apply a lot of pressure to stop life-threatening bleeding, so let the person know, it can be painful. “Sir, this could hurt.” Apply pressure directly over the wound until the bleeding stops. Position your body over the would so your shoulders are directly over your hands with your elbows locked. If you’ve been trained in CPR, you might recognize this position. Push down, using your body weight to increase the pressure. If you need your hands, use your knee to apply pressure. If blood soaks through the original gauze pad, you don’t need to do anything, but you can apply an additional gauze pad and continue direct pressure. If that gauze pad becomes soaked, you can remove that one and replace it with a new pad. However, do not remove the original gauze pad that is placed directly on the wound. Also, only add one pad on top of the original. Do not stack multiple pads, as this weakens direct pressure. If the bleeding stops before EMS arrives, check for circulation beyond the injury. Note the temperature and color of the skin and ask the person if there is any tingling or numbness. “Sir, are you experiencing any tingling? Any numbness?” Then, apply a roller bandage over the dressing to hold it in place and maintain pressure on the wound. Place the end of the bandage on the dressing at a 45-degree angle. Continue wrapping the bandage over the dressing. Then, tape to secure the dressing. Check again for circulation beyond the injury. If there is any change, the bandage may be too tight and you will need to carefully loosen the bandage. “Sir, are you experiencing any tingling? Any numbness?” After the bandage is appropriately applied, remove your gloves and wash your hands. So to summarize, when using direct pressure to stop bleeding, remember two key things: One, press as hard as you can directly over the wound; two, hold the pressure until the bleeding stops. Usually this takes at least five minutes, but it could take much longer. Keep applying direct pressure until: The bleeding stops, a tourniquet is applied for life-threatening bleeding from an arm or leg, another person relieves you, you are too exhausted to continue, or the situation becomes unsafe.
Using a tourniquet
For life-threatening bleeding on an arm or leg, use a tourniquet. While waiting for a tourniquet, or if a tourniquet is not available, use direct pressure. There are different types of tourniquets available. All work by applying pressure. If you have gloves, wear them. But if the bleeding is life-threatening and you don’t have gloves, begin providing care immediately. Make sure you wash your hands thoroughly after giving care. Remember, the person may have more than one wound. Find the source of any life-threatening bleeding and care for that wound first.
This is a windlass rod tourniquet. It has four parts: a strap, a buckle, a rod, and a clip with a triangle fastener. To begin, place the tourniquet two to three inches above the wound. You want the tourniquet to be between the wound and the heart. Avoid placing the tourniquet on top of the wound or on a joint. Warn the person that tightening the tourniquet may be painful but it is necessary to control the bleeding. “Sir, this may hurt.” Attach the buckle, or pass the end of the strap through the buckle. And then think, “Pull, Twist, Clip.” Pull the free end of the strap until the tourniquet is as tight as you can get it around the limb. Some tourniquets may allow you to fasten the strap back onto itself after you have pulled it as tight as possible. Twist the rod to finish tightening the tourniquet. Keep twisting the rod until the bleeding stops, or until you can’t twist it any more. Don’t stop, even if the person complains of pain. Then, clip the rod in place to prevent it from untwisting.
Now, let’s take a closer look at the steps applying a windlass rod tourniquet. Place the tourniquet (video shows 2 to 3 inches above the wound), pull the strap, twist the rod until the bleeding stops or until you can’t twist it any more. Then clip the rod in place. You may see other types of tourniquets in addition to windlass rod tourniquets. Although tourniquets may have slightly different designs, all are applied in generally the same way. Position the tourniquet, tighten it and secure it in place. Follow the manufacturer’s instructions for applying the tourniquet that you have.
This is a ratcheting tourniquet. Instead of twisting a rod to tighten the ratcheting tourniquet, lift the buckle to operate the ratchet and tighten the tourniquet, like this. Keep lifting the buckle until the bleeding stops, or you cannot lift the buckle any more. Ratcheting tourniquets are self-securing.
No matter what type of tourniquet you are using, you can apply a second tourniquet if you’ve tightened the first tourniquet as much as you can, but the bleeding hasn’t stopped. Apply the second tourniquet above the first, closer to the heart. After you’ve applied the tourniquet, don’t loosen or remove it. That should only be done by a medical professional.
Tourniquets for Children
The technique for using a tourniquet on a child is the same as for an adult, but not all tourniquets tighten enough to stop bleeding, especially in small children. So, keep these important points in mind:
1. Tourniquets currently are not recommended for children under 2 years of age.
2. Make sure the child and parent or guardian understand the reason for the tourniquet and warn them that it will likely be painful, but this means it is applied tight enough to work.
3. Make sure the tourniquet you have will work. If you’re unsure, try it. But, if you’re unable to fully tighten the tourniquet, remove it and continue applying direct pressure.
4. When placing the tourniquet on a child, make sure you tighten the strap so there is no room between it and the limb before activating the tightening mechanism.
If the tourniquet is not tight enough around the leg, it may be beneficial to move the tourniquet closer on the limb to the body where the extremity is. It’s thicker. Twist the rod to finish tightening the tourniquet.
Heat Stroke
Heat stroke occurs when the body’s cooling system becomes completely overwhelmed and stops working. Heat stroke is life-threatening. A person with heat stroke may have moist, pale or flushed skin. They may also experience an absence of sweating or some degree of sweating, unresponsiveness, confusion, seizure, headache, nausea, dizziness, weakness and exhaustion. After completing your check and call steps, give care for the person with heat stroke according to your level of training. Immediately immerse the person up their neck in cold water to cool them off if you can safely do so. If you can’t immerse the person in cold water, apply cold wet cloths or towels to the skin, then apply ice packs and fan the person. You can also have them take a cold shower. While caring for the person, watch for changes in their condition.
– – – – – – – – – – – – – – – – – – – – – – – – – – – – – – – – – – – – – – – – – –
and see:
Heat illnesses, where it says: “Sunstroke” and “sun poisoning” are not the correct words / terms / phrases for professional rescuers such as lifeguards, EMTs, nurses, and other emergency room personnel, or even just people who do first aid, to use for heat stroke, heat exhaustion or even sunburn.
– – – – – – – – – – – – – – – – – – – – – – – – – – – – – – – – – – – – – – – – – –
Burns
A burn is a type of wound that can be caused by contact with heat, chemicals, radiation or electricity. Burned areas can appear red, brown, black or white. You may see swelling, blisters, or both. Burns range in severity from minor to life-threatening. Burns requiring immediate medical attention include:
Burns that extend through deeper layers of skin, or the fat, muscle or bone underneath
Burns that cover more than one body part or a large percentage of the person’s total body surface area
Burns that affect areas that could impair a person’s function or their ability to breathe, such as burns on the face, hands, feet, joints, or groin
Inhalation burns
Burns caused by electricity, chemicals, radiation or an explosion
Or burns in people with medical conditions or other injuries.
Also, if the person is a young child, an infant or an older adult, immediate medical attention should be obtained.
After completing your check and call steps, give care for the person with the burn according to your level of training. To give care, cool the burn under clean, cool running water. Cool the burn as soon as possible for at least 10 minutes but ideally 20 minutes. If clean, cool running water is not available, you can use clean lukewarm water or apply a cool or cold compress. Never use ice, ice water or a freezing compress to cool a burn. Finally, leave the burn uncovered. EMS personnel will give care when they arrive. However, if EMS is delayed or you are in a remote location, cover the burn loosely with a sterile dressing. If a sterile dressing is not available, a clean dressing or even plastic wrap may be used to cover the burn.
Head, neck and spinal injuries
Traumatic accidents such as falling from a height, getting thrown from a vehicle or sustaining a blow to the head can cause head, neck and spinal injuries. Signs and symptoms that might cause you to suspect a head, neck or spinal injury include: mechanism of injury, which means the method by which the injury occurred; a change in behavior or mental status, for example, unresponsiveness, confusion, stumbling, repeatedly asking the same questions, memory loss, nausea or vomiting, or speech problems; head, neck or back pain or a visible injury; a partial or complete loss of sensation or movement in part of the body; seizures; crying, especially if inconsolable; and the inability to do activities that the individual could previously do, such as walking.
After completing your check and call steps, provide care for the person with a head, neck or spinal injury according to your level of training. While you are waiting for EMS personnel to arrive, have the person remain in the position in which they were found, unless you need to move them to give CPR or control bleeding. Also, help maintain the person’s body temperature, and based on your level of training, care for any other injuries that may be present.
Concussion
A concussion is a traumatic brain injury that alters the way the brain functions. Concussions can occur any time a person experiences a bump, blow or jolt that results in rapid movement of the brain within the head. Signs and symptoms of a concussion include: dizziness, loss of consciousness, headache, confusion, blurred and/or double vision, nausea, vomiting, seizures, memory loss, crying, especially inconsolable crying, and the inability to do activities that the person could previously do. As always, complete your check step. If you think a person has a concussion, advise them to stop their activity. If you see signs and symptoms of concussion in a person, call 9-1-1 and get the equipment or tell someone to do so. Then give care for a person with a concussion according to your level of training.
First air care for concussion is the same as for all types of injuries to the body. While you are waiting for EMS personnel to arrive, have the person rest without moving, help maintain their body temperature and, based on your level of training, care for any other injuries that may be present. If, for any reason, EMS was not called, the person should follow up with a healthcare provider as soon as possible for a full evaluation.
– – – – – – – – – – – – – – – – – – – – – – – – – – – – – – – – – – – – – – – – – –
also see: Concussion signs and symptoms, prevention
– – – – – – – – – – – – – – – – – – – – – – – – – – – – – – – – – – – – – – – – – –
Hypothermia
Hypothermia is a potentially life-threatening, cold-related emergency that occurs when the body loses heat faster than it can produce it. Typically, the person experiences exposure to cold air temperatures, cold water, or both. Hypothermia can also occur when the weather is not cold, such as when the person experiences prolonged exposure to a wet or windy environment, wet clothes or sweating. The person with hypothermia may be shivering, pale, and cold to the touch. But as the condition worsens, the person may lose their ability to shiver, which is the mechanism that allows them to create heat. They may also become disoriented. After completing your check and call steps, give care for the person with hypothermia according to your level of training. First, move the person to a warmer place. Then, remove any wet clothes, wrap them in a blanket, and cover their head to slowly warm them. Finally, reassure them until help arrives.
– – – – – – – – – – – – – – – – – – – – – – – – – – – – – – – – – – – – – – – – – –
You can read more, including about frostbite, at:
Cold illness and injuries
– – – – – – – – – – – – – – – – – – – – – – – – – – – – – – – – – – – – – – – – – –
Poison Exposure
A poison is any substance that causes injury, illness or death if it enters the body. Signs and symptoms of a poison exposure vary depending on the type and amount of poison taken into the body and the way it enters the body. A person exposed to poison may experience abdominal pain, nausea, vomiting, diarrhea, abnormal skin color and sweating. They may also experience life-threatening conditions, such as trouble breathing, fast or slow breathing, fast or slow heart rate, unresponsiveness, changes in level of responsiveness, seizures, headache, dizziness or weakness. As always, complete your check step. Then, if the person shows signs and symptoms of a life-threatening condition, or if multiple people are affected, call 9-1-1 and get the equipment or tell someone to do so.
If the person is responsive and alert, call the National Poison Help Hotline at 1-800-222-1222 and give care as advised.
– – – – – – – – – – – – – – – – – – – – – – – – – – – – – – – – – – – – – – – – – –
– – – – – – – – – – – – – – – – – – – – – – – – – – – – – – – – – – – – – – – – – –
The author of this webpage, (written for my students), does not give any warranty, expressed or implied, nor assume any legal liability or responsibility for the accuracy, completeness, or usefulness of any information, product, or process included in this website or at websites linked to or from it. Users of information from this website assume all liability arising from such use.