The Red Cross released a new Lifeguard Training certification program in early February 2024.
August 31, 2024: Basic level lifeguard courses based on the 2017 manuals will no longer be taught.
“all courses must be complete on this date.”
I am leaving this webpage for future reference.
The new manuals are not available online for anyone to download and read.
The copyrighted 2016, released 2017 American Red Cross Lifeguarding Instructor’s Manual does not reference which page in the participants manual (American Red Cross Lifeguarding Manual) the material the instructor is lecturing about. It only references chapter numbers.
In the waterfront lifeguard training section it does not even give chapters and the lecture skips around many different participant manual pages.
Below are page numbers to write in your manual, some notes on other references, and in some cases, why I wrote the notes. (I had the assistance of three other Red Cross lifeguard instructors, one of whom is also an L.G.I.T. All of us have been Waterfront Lifeguard instructors and volunteered as lifeguards at multiple open water and swimming pool triathlons.)
___________________________________________
A reminder to my instructor students. During class we often find that instructor candidates sometimes feel they should ‘add’ to the lesson plan.
Instead of reading out loud EXACTLY what the Red Cross wants them to read, they elaborate and sometimes add in things that are not-quite-true.
You do not have enough time in any lesson plan to ‘add’ to it.
Keep it simple. You do not need to overdo it with powerpoint beyond what the Red Cross offers, flashy pictures/posters, ![]() laser pointer, interactive holography, light show, fireworks, attempts at mental telepathy or Vulcan mind melds, fog machine, cheerleaders, drum and bugle corps, tiki torches, string quartets, brass band, flocks of doves, dancing bears, or parading costumed elephants.
laser pointer, interactive holography, light show, fireworks, attempts at mental telepathy or Vulcan mind melds, fog machine, cheerleaders, drum and bugle corps, tiki torches, string quartets, brass band, flocks of doves, dancing bears, or parading costumed elephants.
___________________________________________
But first, the participant’s manual:
The copyrighted 2016, released 2017 American Red Cross Lifeguarding Manual does not reference skills sheet page numbers at the pages about each subject.
To make it easier/faster for my classes to find the Red Cross Lifeguarding Manual skills sheets and in some cases, to make the skills easier to do, I ask them write page numbers/notes at many pages. For longer notes they can print the write in your Red Cross Lifeguarding Manual webpage, cut out paragraphs and paste them into their participant’s manual.
I would like to suggest that instructors also write the notes at write in your Red Cross Lifeguarding Manual in their copies of the American Red Cross Lifeguarding Manual.
Note the “You might find it easier” references for some of the skills.
Some, but not all, of the suggestions for the participants manual are referenced at this page.
PLEASE NOTE THAT THESE PAGE NUMBERS ARE FROM THE ORIGINAL PRINTING OF THE MANUAL.
IT HAS SINCE BEEN REPRINTED AND YOUR COPY MIGHT NOT HAVE THE SAME PAGE NUMBERS AS WHEN WE WROTE THIS
– SO DOUBLE CHECK THEM AS YOU WRITE THEM IN.
___________________________________________
Back to the Instructor’s manual references:
In the instructor’s manual, each page has a series of boxes. I write the participants manual page number in the long, narrow column to the left of the section I am lecturing from so I can send people to that page during the lecture. I suggest you cross reference these as you write them in, in case you disagree with what page should be referenced.
I also included items worth mentioning, many of which are quotes from the copyrighted 2016, issued 2017, First Aid for Public Safety Personnel (California Title 22) lectures. As I read the First Aid for Public Safety Personnel Instructor’s Manual Supplement I noticed things first aid and lifeguard students had had questions about.
Some other notes are to help students better understand things that previous students have been confused about, or just links to info not covered in a lifeguarding manual that previous students have appreciated knowing about.
Safety notes: since the backboard can be accidentally dropped during any extrication, it can be wise to warn the lifeguard candidate being a “victim” to lift their head slightly off the backboard as they are being pulled out, since if they have their head on the board and it is dropped, it can hurt a lot.
Whenever the class will be swimming to depth, it can be wise to remind them and lead them through how to equalize the pressure in their ears before they try each deep water skill.
_______________________________
On page 66
second box at the top left hand side, write: 4
at the second half of the second box, write: 5 (see also 94)
On page 67 near the top, write: 3
Page 68, first box write: 8
second box, near the bottom, write: 9
Page 69 write: 9
It is worth mentioning during your lecture on consent, that the emergency medical assistance for a minor (under age 18) without a parent/guardian to be found, is implied, BUT it must be for a life-threatening problem, not just a small scrape.
Just because someone is a friend or relative, consent is not implied for them.
Page 70 write: 10
Page 71 write 11, then write 12
Page 72 at the top, perhaps there is a typographical error. Make the following correction, where it says “you do not need to have the class complete all three,” change it from “all three” to “both”.
Page 73 write: 13
Page 74, in both boxes, write: 25
Page 75, first box write: list on 31-32
Page 75 second box, write: keep the rescue tube ready, page 25
Page 76, second box, write: 40
Page 77, first box, write: 40
Page 77, second box, write: 43
Page 78, at the top, write: blank activity worksheets are in this instructor’s manual, un-numbered pages following page 524
Page 80 second box, above the word entries write: 148, above the word approaches write: 149
Page 81 write: 145, 148
Page 82 write: skills assessment tools next page
Page 87 near the top write: 46, near the bottom, write 47
Page 88 write: 47
Page 89 second box, 57
Page 90, at the top, next to agonal breaths, write: 236
Page 91, second box, first question, write: 58
third question, write: 59, fourth question, write: 60
One of the listed “situations that could lead to trouble” is “Breath-holding or underwater swimming for an extended period after hyperventilating.”
The Red Cross and YMCA of the USA issued a joint statement in May, 2015 that said, in part, swimmers should limit themselves to “a single inhalation” whenever they hold their breath and submerge.
News releases on the subject and more details can be found at Swim Class Safety Rules, required reading for all my swim students. Scroll down to Hypoxic Training.
Page 92 near the top write: 61, second paragraph
next to science note, write 64
Page 93, first box, write: 65
Page 93, second box, write: 67 and make a change where it says “refer participants to Table 3-2,” Change 3-2 to 3-3.
Page 94, at the top write: this is almost, but not quite, an exact copy of chart 3-3 on page 67 and 68.
Page 95, first box, write: 70
Page 96, first box, next to Ask Drills write: 73, next to Live Recognition Drills write: 73,
next to Lifeguard s r t times write: 74
Page 96, second box, write: blank activity worksheets are in this instructor’s manual, un-numbered pages following page 524
Page 99, first box, first question, write: 91 right hand column
Page 99, second box, write: 92
Page 100, first box, write: 92
Page 101, write: 96
Page 103, second box, write: blank activity worksheets are in this instructor’s manual, un-numbered pages following page 524
Page 104, first box, write: 97
Page 104, second box, write: 98
Page 104, fourth box, write: 109
Page 105, first box, write: 109
Page 105, second box, write: 106
page 106, first box, write: 169-70
page 110, first box, write: 73 and at the top of the blue box next to it, write: Instr. 96
page 112, first box, write: 99
page 113, first box, write: 100
Page 115, second box, write: 118
page 116, first box, write: 119 and below that 127, table 5-1
In the participants manual, Page 127 includes calling 911. Your students also might be interested to know in a lot of Canada you can dial 911 in an emergency just like in the U.S. But in other countries it’s often a different number. See this list from the U.S. Department of State and double check when you get there:
https://travel.state.gov/content/dam/students-abroad/pdfs/911_ABROAD.pdf
And note that in many other countries, when you call their emergency services (911 or 999 or 112 or a local number or ___ ) it does not necessarily mean an ambulance will be dispatched. The emergency services operator decides what’s appropriate, talking you through your own first aid, or sending you to your doctor or sending an EMT with or without an ambulance.
Page 116, second box, write: blank activity worksheets are in this instructor’s manual, un-numbered pages following page 524
In the participants manual, page 134 has info on Critical Incident Stress. OSHA has more info at: https://www.osha.gov/SLTC/emergencypreparedness/guides/critical.html I have my students repeat after and/or with me, that the physical and emotional signs are “common and normal.”
page 120, first box, write: 149, 150, 152 and below that 173, 174, 175, 176, 179
page 122 make a note that it can be wise to not allow any of the lifeguard candidates swim butterfly during this activity, as it can be confused with an active drowning victim
page 124, first box, write: 173, second box, 174, third box 175, fourth box 176
(Hmmm, did you notice what we suggested writing in the participant’s manual about the way we were originally taught to do Passive Victim Front Rescue?
“page 175 step 3 write: You might find it easier to roll the victim over if you use a bigger “twist.” Swing the victim’s wrist/forearm in a large arc underwater, down, to the side and up. OR you might find it easier if you use instructions from a YMCA Lifeguard Manual: “Grasp the victim’s wrist with your thumb on top. Turn the victim faceup by pulling the arm down and then back up toward the surface (draw a U). Simultaneously, with the opposite hand in the center of the tube, push down to submerge the tube while pulling the victim’s wrist just past your ear and pulling him or her onto the tube.” )
Page 126, in my copy of the book, there seems to be some typos. In the fourth box down, “leans back to pull victim face-up” should be in the ‘not proficient’ box, and “rolls victim over” should be in it’s place in the ‘proficient’ section. And in the fourth box on the right hand side, we replaced the word “pull” with “roll.”
The last boxes (‘switches to a towing position’) should not be there at all.
page 131, first box, write: 151, and in the box to the right of it, write 180, 183
page 132, first box, write: 180, 181, 182, 183, 185, 187 at each of the skill demonstrations
When you are watching a deep water passive victim rescue, it can be difficult to see below the surface. Lifeguard candidates are sometimes tempted to try to do the rescue without using their rescue tube to pull the victim to the surface. You will be able to see if they are using the rescue tube, because the tube will be bobbing up and down in the air as the tension on the strap increases or decreases:
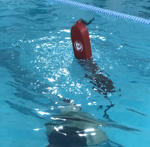
or this can be a good time to have a second instructor in the water, watching below the surface.
(See step Page 186, step 5 of Lifeguard Manual.) When doing an extrication using a backboard at the pool edge, it can be easier during the pull/push of the backboard onto the deck if you try to get the board as horizontal as possible as soon as possible, rather than trying to push/pull it at an angle. Especially with a heavy victim, it is easier to slide the board up onto the deck about 50 or 60% of the way, then let it down onto the deck and then slide it the rest of the way flat along the deck, instead of lifting the entire weight of the board and victim for the entire distance.
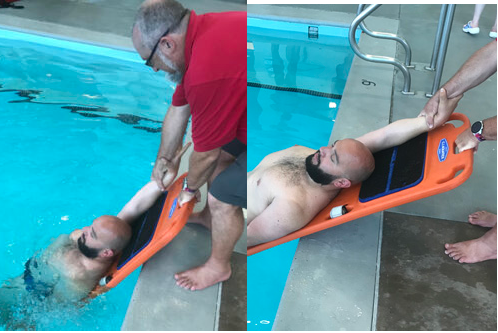
While pulling it out, when you feel it reach the balance point, flatten it down to the pool deck (you might want to go into a kneeling position to do this), then slide it the rest of the way along the deck:

Be sure to note how much space there is between the hand-hold end of the backboard and the deck. Some models have enough space for you to use either of the three handholds but other models of backboards have little space when the board is down flat on the deck.


page 134, first box, at the end at shallow water lifeguard, write: 180
page 135, last box, write 180
page 136, first box, write 183
page 136, last box, write 180
Page 137, second box, write: 183, last box write 181
page 138, first box, write 182 and next to the words “equalize pressure”, write 159
page 145, first box, write 203, second box, write: 223
and make a note: Kevlar gloves are puncture resistant. Nitrile gloves are resistant to most moderate chemicals.
In the participants manual,
Page 203 Bloodborne pathogens does not cover ebola.
https://www.osha.gov/SLTC/ebola/
https://www.cdc.gov/vhf/ebola/index.html
page 146, first box, write 206, 208
and make a note that Hepatitis B virus can live on a surface, exposed to the air and dried, for two weeks.
Never pour undiluted bleach straight from the bottle onto spills of blood, urine, sputum or vomit. Dangerous levels of toxic chlorine nitrous oxide gases could result.
In the participants manual,
Page 207 includes hepatitis vaccinations. Generally, the vaccinations you got as a child will protect you the rest of your life, with a few exceptions. An adult recommended vaccinations schedule is at http://www.cdc.gov/vaccines/schedules/index.html
page 148, first box, write 213-4
next to the Science Note, write: shout-tap-pinch is not mentioned in the student manual. Shout-tap-shout is on page 213.
It could be worth mentioning to students that unconsciousness and being asleep are not the same. Also, you can be awake and only partially conscious.
page 149, first box, write 213, 229-230
page 150, first box, write: 216, second box, 224-5, fourth box 229-30
page 151, first box, write: 214, second box, 213
page 152, first box, write: 233, second box, 233-4
page 153, first box, write: 234, below that, 234, 239-241
In the participants manual,
Page 241 has info on administering epinephrine. The U.S. Food and Drug Administration (FDA) has made updates to the patient instructions for epinephrine auto-injectors:
http://www.accessdata.fda.gov/drugsatfda_docs/label/2016/019430s061lbl.pdf
Especially note the Injection-Related Complications, for example, “do not inject intravenously, into a buttock, digits, hands or feet.. . Hold leg firmly during injection. Lacerations, bent needles, and embedded needles have been reported when EpiPen and EpiPen Jr have been injected into the thigh of young children who are uncooperative and kick or move during an injection.”
page 154, first box, write: 259
page 156, first box, write: 261
page 157, first box, write: 245, third box 247, 263
(If you are not including an Oxygen Administration course with the lifeguard cert, now could be a good time to point out the info on pages 248-253, 269-270 and encourage learning these skills in another class.)
page 158, first box, write: 266
(As you finish chapter 6, students might wonder why you skipped Escapes and in-water ventilations, so tell them in advance of their asking that these skills will be covered later.)
page 172, second box, write:273
page 173, first box, write: 274, second box, write 275
page 178, first box, write: 277
page 180, first box, write: 279
page 182, first box, write: Do and Don’ts 280, second box, 280-282
note that we ask instructor candidates to write in their manual on page 281, below figure 9-6, write: dripping wet lifeguards need to dry off before they drip on the victim’s chest, or a dry lifeguard not involved in the water rescue needs to attach the pads and operate the AED.
page 185, first box, write: 299
page 186, first box, write: 283, 289 second box, scenario 1: write 269/311. scenario 2: write 271/312
at about page 186, for the multiple rescuer response, note that if you use a rescue tube with the manikin to simulate the rest of the body, it can be used to remind the lifeguard candidates that they do not want to ever step over a victim during any kind of rotation.

Kickboards can always be more comfortable to kneel on than the pool deck.
Before your students start their first rotation, tell them which direction to rotate. This can be a simple as “to the right.” Remind them that if they always practice during in-service training using the same rotation direction, it makes it easier. And, they will look more professional if they ever need to do it in real life. (There will likely be pool patrons with cell phones videotaping what is going on.)
page 187, first box, scenario 3: write 273/313. scenario 4: write 276/314
page 197, first box, write: 304 & 338
page 198, second box, write: 306
page 199, second box, write: 309, third box at “guide participants through” 337
For more info on why you should not clean wounds with hydrogen peroxide to prevent infection,
UC Berkeley Wellness told us:
“If possible, hold it under cool running water. According to Larry Weiss, M.D., professor of emergency medicine at the University of Maryland School of Medicine in Baltimore, “the only thing proven to prevent infection is irrigation.” Use soap on the surrounding skin, but not on the wound itself. If you see dirt particles, remove them with tweezers.”
“Experts disagree about antibiotic creams. Some people (especially parents) would not be without bacitracin, neomycin or a similar ointment. These cause skin irritation, however, and are unnecessary if you cleanse the wound and keep it clean. Harsh antiseptics such as rubbing alcohol, iodine, hexylresorcinol and hydrogen peroxide are not only unnecessary but can actually damage skin and retard healing.”
Plus, these are painful when applied!
At page 312 in the participants manual at the bottom of the page, I ask my lifeguard candidates to write: “never use Crazy Glue on a wound”. Some of them have countered that there is a substance like Crazy Glue used in surgeries, to which I say, surgeries are very clean and there is little chance of infection. If a lay person uses glue on a wound, they are often sealing in germs and serious, even life threatening infections can occur. Some people recommend using it on your dog, but again, you risk serious infection. The manufacturer says “Krazy Glue products should not be used for wound care.”
U.C. Berkeley Wellness warns: “Lots can go wrong if you try to glue a wound. Unless the glue is precisely applied, the edges of the wound may not close up and/or the glue can migrate into the wound, which can result in inflammation and infection and may require surgical treatment.”
and see First Aid Facts and Fallacies
page 200, first box, write: 314
On the same page in the student manual about shock, (314), hemostatic dressings are mentioned. It could be worthwhile to tell students that to stay effective, hemostatic dressings require continuous direct pressure at the source of the bleeding until controlled.
page 201, first box, write: 315-319, second box, 315, third box: 316, fourth box 316
page 202, first box, write: 317, second box, 318-9, third box: 321, fourth box 322
If a lifeguard candidate asks about using aloe cream on burns
U.C. Berkeley Wellness wrote about the lack of research on aloe, and said: “Nearly all commercial aloe creams and lotions actually contain so little pure aloe that they couldn’t have much effect (they are simply moisturizers). Some contain other chemicals of questionable usefulness. Even if you use pure aloe, there are more than 300 species, with different chemical compositions and thus possibly different effects.”
Ticks: If a student asks about removing a tick: apply fingernail polish, alcohol, a hot match, petroleum jelly, lotions or other potions.
NO, they do not work and they increase the risk that the tick will salivate or regurgitate into you and increase infection.
page 203, first box, write: 323, second box, 324, and you can add an “R’ to the word “emegnecies” third box: 325
It could be worthwhile to tell your lifeguard candidates that if part of a bone is protruding through the skin, do not attempt to align/straighten the bone or place the bone(s) back into the body.
page 210, first box, write: 341
page 212, second box, write: 161/198, 161/199
page 221, second box, write: 341, 342
page 222, write: 359, 360-1, 366, 368
—————- ————————-
and note what we suggest that students write in their participant’s manual on pages 367 & 369:
Page 367, step 10 It can be easier during the pull/push of the backboard onto the deck if you try to get the board as horizontal as possible as soon as possible, rather than trying to push/pull it at an angle. It can also be easier, especially with a heavy victim, to slide the board up onto the deck about 60% of the way, then let it down onto the deck and then slide it the rest of the way flat along the deck, instead of lifting the entire weight of the board and victim for the entire distance.
Page 367 end of step 7, 369 end of step 6 and 371 end of step 7 write: Some head immobilizers will not attach to the backboard Velcro unless hair is moved out of the way. To do this you will need to put on one head immobilizer at a time as you sweep the hair out of the way.
Page 367 step 7 (last photo on page 366) write: Most (but not all) CJ1000 Spine Boards (for example) have the strap with sticky Velcro on the left side of the backboard (left side as referenced to the victim’s left side of their body) and the soft Velcro strip on the right side. If you rescue the spinal injury victim by approaching their right side you will be in a position when you get to step 7 to be able to reach across the backboard and grab the sticky Velcro strap, pulling it tight across the victim, and holding them in place sooner/better, then putting the soft Velcro strap across on top of the first strap you are still pulling on/holding the victim in place with.
In the photo below, the black strap has the sticky sided Velcro, the white strap has the soft sided Velcro strip. You can see the lifeguard’s right hand holding the end of the sticky Velcro strap tightly across the victim’s body, and the lifeguard’s left hand holding the end of the soft Velcro strap, about to place it across and on top of the sticky Velcro strap. It could be wise to try this from each side of the backboards you use for training/rescues at your facility and see for yourself if you have better control/stability.
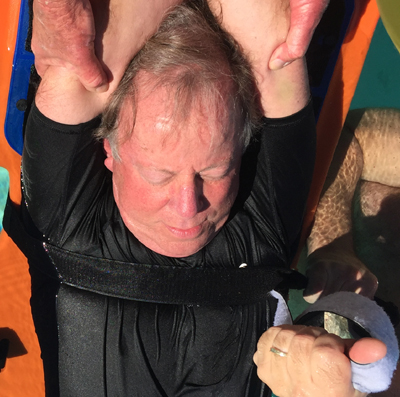
(This is rare, but if your backboard has the soft sided Velcro strap facing up, in a position where it would be pulled across as the bottom strap, and the sticky Velcro strap would go on top of it, then you would want to experiment differently with it.)
If you are using a plastic backboard with separate strap(s) in a Spider Strap configuration, please note that the Spider Strap will float around and the extra ends you are not using can really get in the way, so you should consider replacing the Spider Strap with one strap designed for your model of backboard.
All this is also applicable to page 368 step 5.
Page 369, step 8 It can be easier during the pull/push of the backboard onto the deck if you try to get the board as horizontal as possible as soon as possible, rather than trying to push/pull it at an angle. It can also be easier, especially with a heavy victim, to slide the board up onto the deck about 60% of the way, then let it down onto the deck and then slide it the rest of the way flat along the deck, instead of lifting the entire weight of the board and victim for the entire distance.
———————————————–
page 274 If a student asks about “cough CPR” (Cough if you feel a heart attack coming on.)
U.C. Berkeley Wellness calls this “a prime example of much of the health advice you’ll find on the Internet: mostly bogus but containing a shard of truth . . . wishful thinking, disavowed by Rochester General Hospital — to which the advice is sometimes attributed — as well as the American Red Cross and American Heart Association.”
You can read more at:
https://www.heart.org/en/health-topics/cardiac-arrest/emergency-treatment-of-cardiac-arrest/cough-cpr
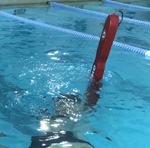
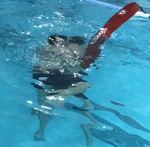
WATERFRONT LIFEGUARDING
page 410, second box, write: 34
In my waterfront lifeguard class we talk about gloving up to clean up the sand at a beach each morning. We talk about the occasional need to look for used needles when you rake the sand. Yet another hazard is from the National Park Service Morning report of Monday, December 29, 2003:
Dry Tortugas National Park (FL)
Employee Injury from Bang Stick Discharge
While on patrol along the beach at Garden Key on the afternoon of December 18th, ranger Tim Morrison discovered a stainless steel object approximately four inches long lying in the sand. Initial examination indicated that the object was possibly the nozzle to an air compressor hose. Morrison placed the object in his pants pocket and continued working the rest of his shift. Later that evening, he removed the object from his pocket to re-examine it. After looking it over, he set it down on a table, at which point it detonated. The discharge of what was later determined to be a .357 caliber round severely injured his right index finger and caused powder burns to his face. The Coast Guard was notified and airlifted Morrison to Key West Hospital at about 3:30 a.m. After several hours of surgery, doctors where able to clean and close the wound. A day later, Morrison was released by the hospital. Investigation revealed that the object was the end of a device used by scuba divers called a “bang stick.” In this case, it was made of stainless steel. The bang stick broke down into two parts by unscrewing it. Inside one part was a firing pin and spring; inside the other was the an empty casing to a .357 magnum round. The bullet embedded in the ceiling of Morrison’s quarters at Fort Jefferson. It only takes approximately two pounds of pressure to set one off and is usually used in conjunction with a long rod or stick. The device, when not attached to a stick, looks very benign. Morrison hopes this information prevents such an unfortunate incident from happening to anyone else.
[Submitted by Willie Lopez, Site Supervisor]
page 411, first box, near the top, write: 35, and near the bottom at water quality, write 37
page 412, first box, write: 32 then 43, second box, 36, then “thermocline and gasp reflex page 166″
page 413, write: 36
page 414, write: 155 at cross bearing, 156-7 at search, 76 at watercraft
page 415 write 109, 100-101 and write 103-4 at buddy systems
page 416, first box, write: 109, second box at the top, write: 125, at the bottom, write: 124
page 417, write 176 at run and swim entry, 190 at walking assist, 190 at beach drag, and 365 at head-splint
page 418 where it says: ” . . . nose until the pressure is relieved.” add: “But don’t let any air escape from your nose.”
page 418, write 158 at fitting a mask, 160 at entering with mask and fins, 157 at searching deep water
and perhaps mention to students: when looking from the surface to the bottom in a quick search immediately after someone is missing, or when searching where there are many waterweeds, or murky water, you should not necessarily have in mind to look for the full shape of a body lying on the bottom. On light colored sand a light skinned person might not be that visible, but their dark swimsuit or dark hair could be, or vice-versa dark skin and a yellow bathing suit, for example.
It could be wise to have swimmers wear yellow/bright pink/lime green/white swim caps like they do at open water triathlons.
page 419 write: 192, 193, 194
(Sorry, little spare time . . . NOT ALL of the typos we found, or things that seem to be missing/out of place, are listed at this page.)
Puleeeeease go to the new Instructor’s Corner and look for the corrections they posted shortly after the release of the new lifeguarding program. AND second / third printings of the manuals might have things corrected.
(As I have the time I may add to this webpage, but the waterpark skills pages are not at the top of my to-do list.)
See also:
Lifeguard Training FAQS has advice on how to pass the prerequisite swim tests that you could pass on to potential students.
– – – I give this advice at the start of the class about waterproof sunscreen. A sun protection factor (SPF) of 15 means you can supposedly stay in the sun 15 times as long as without using it, but it rarely works that well. If you are worried about getting too much sun you should be using sunscreen of 30 or even 60 regularly, not just at the pool.
Read the instructions, do they say you have to wait 30 minutes after applying the sunscreen before you can get in the pool? (Most kinds will wash right off and just make an oil slick in the pool if you apply them right before getting in). I use a brand that allows me to get in the pool right away.
Test a little before you use any extensively; some people are allergic to some kinds.
– – – I also give this advice: Lifeguard training students should remove all piercings, but at least those that protrude from your body (example: you might be safe with a flat ear stud, but not with loop earrings). Read body piercings and lifeguards to help you determine which piercings you will remove:
http://www.aquaticsintl.com/lifeguards/saving-your-skin.aspx
How to pass a Red Cross test has the advice I give my students before an exam.
Some of these are designed for an in-service training project, or just as additional training resources.
See Interacting Professionally with the Public, page 94 in the Lifeguarding Manual. lifeguard training, discussing professionalism
Photos of lifeguards on duty who were not ready to rescue
Should lifeguards wear cowboy boots? is a quiz for lifeguard classes or an in-service training
See Enforcing Rules, page 93 and Communication with Patrons and a list of rules on page 92 of the Lifeguarding Manual. Preventative Lifeguarding has notes from various staff manuals, personal experiences and the Red Cross texts. It includes UNSAFE PRACTICES or potential problems TO WATCH FOR, areas where most accidents occur, accident prevention tips that USA Swimming coaches know and suggested disciplinary action for minor and major infractions.
Tips for guarding open water swims
tips for guarding kids’ triathlons
First Aid for Public Safety Personnel study guide
CPO What a certified pool operator (CPO) knows that lifeguards and swimmers should know.
Neighborhood Watch applied to swim centers
A collection of pool rules to choose from is at:
pool rules: attire, health and sanitation
pool rules concerning children
Is your facility user friendly for all your customers? Take a look at an Americans with Disabilities Act, ADA Guide for Small Businesses:
https://www.ada.gov/smbusgd.pdf

CEUs are available for your students who complete a Red Cross lifeguard training course.
Go to: http://www.redcrossstore.org/dp.aspx?pgid=547
To get a free download of the copyrighted 2016, released 2017 American Red Cross Lifeguarding Manual go to:
https://www.redcrosslearningcenter.org/s/candidate-lifeguarding
scroll down to
Participant Materials (Core)
then click on and save
Lifeguarding Manual June 2017
To make it easier to find the skills sheets pages write in your Red Cross Lifeguarding Manual.
see also:
What the AED says as you use it
How to pass a Red Cross written test
Bloodborne Pathogens quick facts
Oxygen administration quick facts
first aid Secondary Assessment
Times to suspect a spinal injury (symptoms, causes, signs of spinal injury)
causes of fainting, altered mental status, sudden altered mental status, unconsciousness
Seizures, causes of and basic care for
Concussion signs and symptoms, prevention
(Note to on-line users not in my classes: this is a study sheet. It is not complete instruction in lifeguard training, first aid or any topic named in the webpage title or links.)